Monday, August 30, 2010

Pocket Silhouettes

This stamp set is so versatile...it is a MUST have stamp set!


Stampin' Up! Products
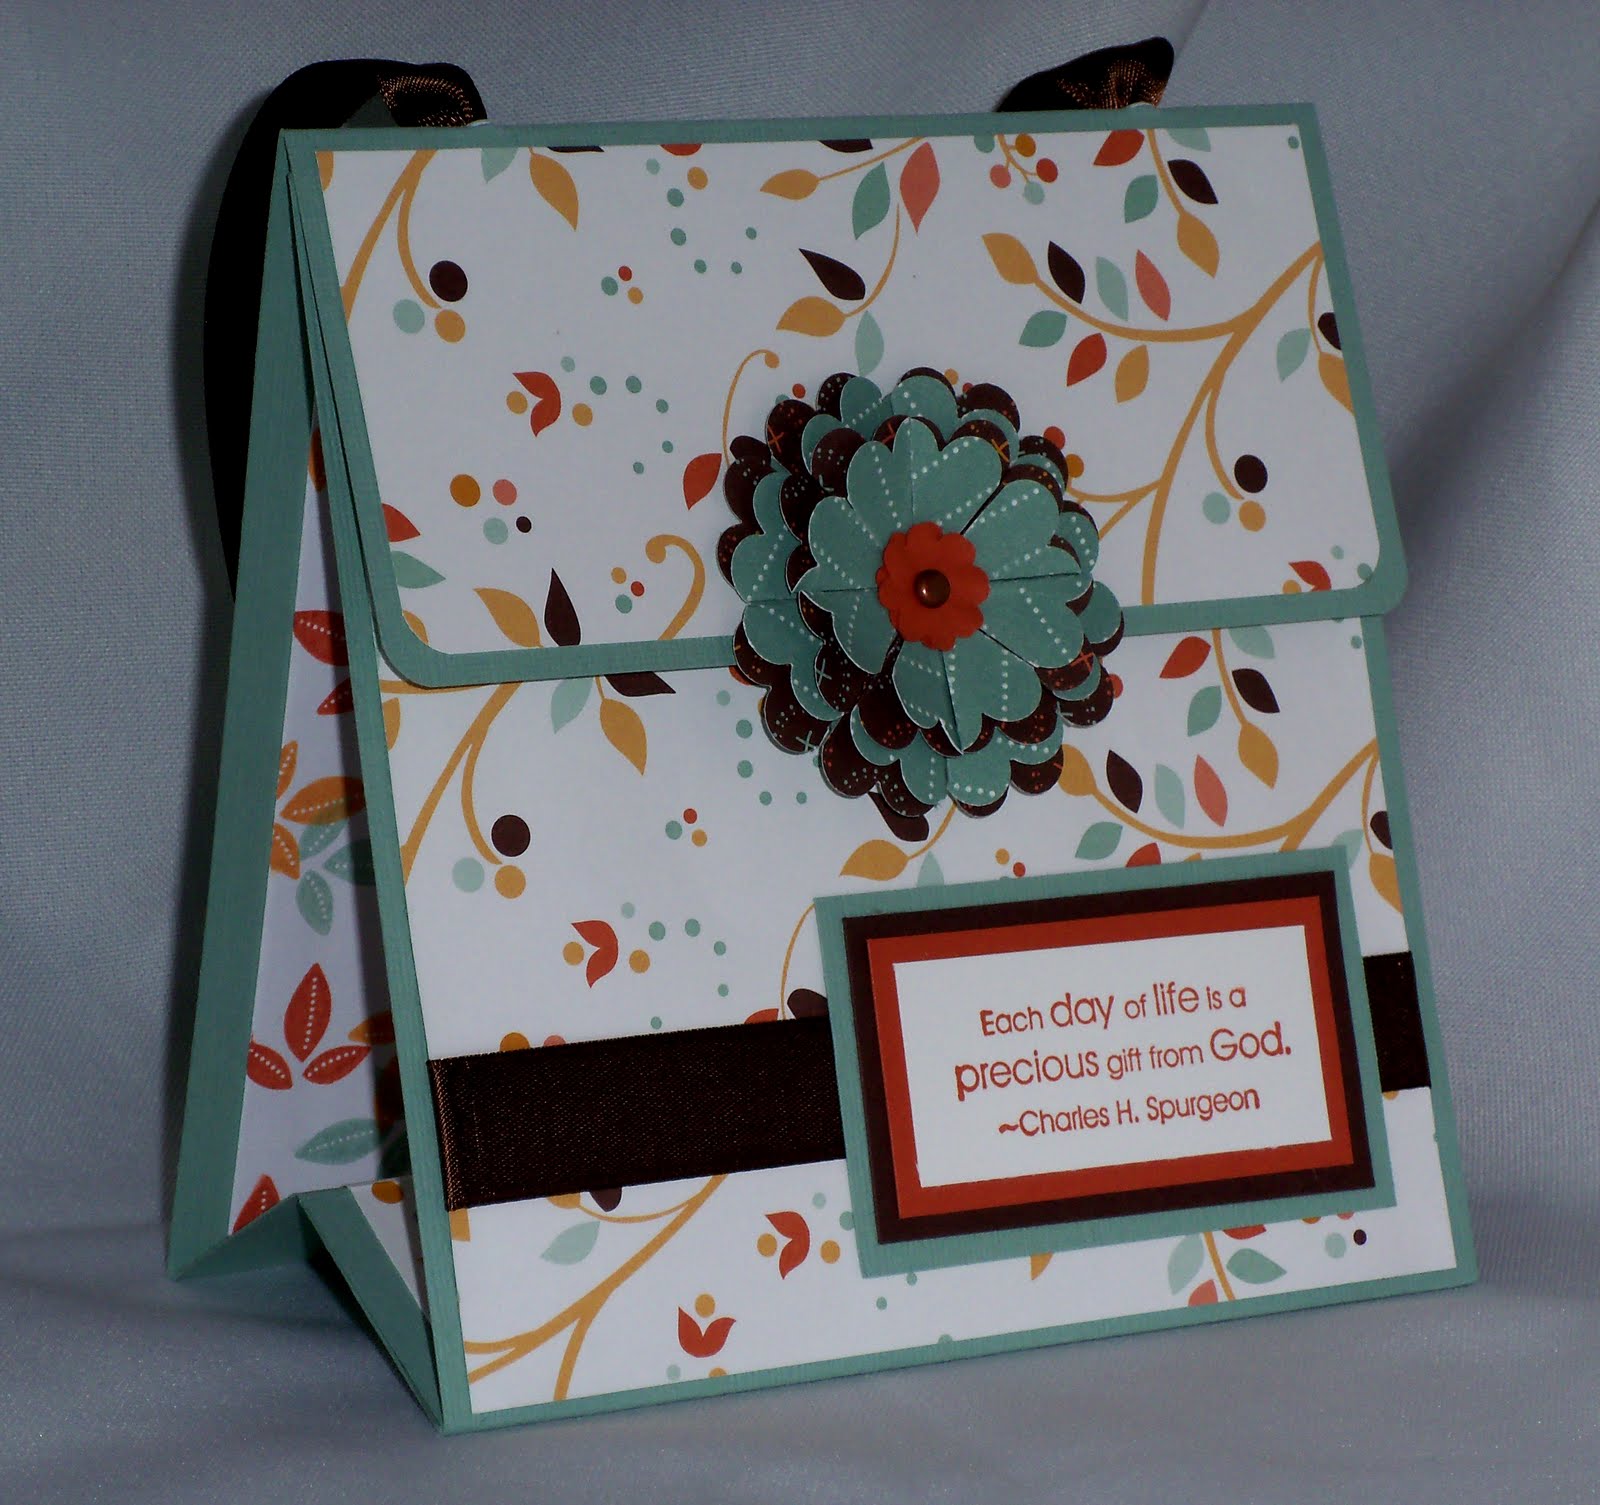
  • Always Artichoke card base 11" x 4 1/4", scored along 5 1/2"
  • First layer - More Mustard cardstock cut at 5 1/4" x 4"
  • Second layer - Autumn Traditions Designer Series Paper cut at 5" x 3 3/4"
  • Stamped image Whisper White cardstock cut at 2 1/2" x 1 5/8"
  • Pocket Silhouettes stamp set using Soft Suede ink
  • More Mustard layer cut at 2 3/4" x 1 7/8"
  • Always Artichoke layer cut at 3" x 2 1/8"
  • Flowers (Always Artichoke, Elegant Eggplant and More Mustard) were made using the Trio Flower punch and a stylus (tool for dry embossing and scoring)
  • Sentiment is from the Very Versatile (retired) stamp set, Elegant Eggplant ink on Whisper White cardstock
  • The sentiment was punched out using the Word Window Punch
  • Next layer (More Mustard) was punched out using the Modern Label punch
  • Next layer (Elegant Eggplant) was cut using the Movers & Shapers Modern Label die
  • All layers were glued together, Elegant Eggplant 1/4" grosgrain ribbon was knotted and wrapped around the layers. Final step was to add these layers to the cardbase.
  • Using Elegant Eggplant ink, the Pocket Silhouette imaged was stamped at the bottom left side of the envelope and inside layer (Whisper White cardstock cut at 5 1/4" x 4")
  • Multipurpose Liquid Glue
Other Products
  • Rhinestones
  • Glue pen

We have Two Winners!

Using http://www.random.org/ and the nine comments on my blog posting: Win Blog Candy.

True Random Number Generator
Min: 1
Max: 6
Result: 1
The winner is:  Susan B.

Susan said . . .

Heck yeah! I'll post a comment!
August 25, 2010 11:26 AM
Two winners you ask?? I was so touched by Yvonne's comment, that I am sending Yvonne one of my Post-it-Note covers.

Yvonne, you are a winner!
Yvonne said . . .

Hi Beth
I can't enter your giveaway, as I am in Australia, but I just wanted to say what a wonderful idea these are.

And I appreciate you sharing the directions so we can give it a go ourselves.

I've enjoyed exploring your site. You have some great projects.
I've now signed up to be a follower.

Thanks for the inspiration.

August 27, 2010 7:07 AM

Thank you everyone for participating in my blog giveaway!

Friday, August 27, 2010

Altered Composition Book

Altered composition book, perfect for journaling. 

Sentiment .........
We make a
living by what
we get, but we
make a life
by what we GIVE.
~Winston Churchill

Stampin' Up! Products
  • Basic Black, Riding Hood Red and Whisper White cardstock
  • Occasional Quotes (Level 3 Hostess) stamp set
  • Riding Hood Red Ink
  • Exclusive Sizzix Top Note die
  • Boho Blossoms and Corner Rounder punches
  • Hodgepodge buckle
Othe Products
  • Patterned paper
  • Brad
  • 3/8" grosgrain ribbon
This item is available for purchase, please contact me.

Woohoo! An Etsy Sale - Special Order

I had the pleasure of creating seven Halloween Post-it-Note covers for Debbie through my Etsy store.  Apparently, she fell in love with them and wanted to purchase more than one.

It's the little things that make life so grand!

Thank you Debbie

Wednesday, August 25, 2010

Win Blog Candy

Post-it-Note Covers
Sticky Note Covers

I enjoy making these handy Post-it-Note covers, they are PERFECT to have in your purse.  Each pad measures 3" x 3" and has approximately 65 sheets.  Free instructions can be found HERE.

I have decided to put them in my Etsy store for sale.  Please visit my store HERE or email me to purchase.  If you live in Jasper, I could deliver without a shipping cost.

Stampin' Up! Products used in the Halloween cover
  • Batty for You and Lovely Letters stamp sets
  • Old Olive, Only Orange and Perfect Plum cardstock
  • Old Olive ink
  • 1 1/4" Circle , 1 3/8" Circle and Scallop Circle punches
  • Cast A Spell Designer Series Paper
Other Products used in the Halloween cover
  • Velco-like closure

How can you win one?  Leave a comment in this posting.  I will randomly pick one of the comments and the winner* will receive a choice of one of the covers pictured here.   One winner will be picked randomly from all posts to this posting and will be announced on Monday, August 30.

*Shipping only to the United States

Sunday, August 22, 2010

Have you ever used card maps?

It is difficult for me to totally design a card from scratch.  Most of  my inspiration comes from Splitcoaststampers.com and Stampin' Up! Demonstrators.  Card maps are sketches, normally in black and white that help in the proper placement of your embellishments (ribbon, flowers, etc).  Visit the Page Maps Blog for your own inspiration.

Stampin' Up! Products
  • So Saffron cardbase measuring 5 1/2" x 4 1/4"
  • Sweet Pea Designers Series Paper (DSP) measures 5 1/2" x 2 1/4"*
  • Punches used in this card
    • Two-Step Bird Extra-Large
    • 1-3/8" Circle
    • Scallop Circle
    • Word Window
    • Modern Label
  • Movers & Shapers Modern Label die was used for the last layer of the sentiment
  • Using So Saffron and Pumpkin Pie ink, stamps from the Seeing Spots stamp set were randomly stamped on the cardbase
  • Pumpkin Pie cardstock was used for the scallop frame*
  • Bird was punched out of the Sweet Peak DSP
  • Twig was punched out of Old Olive cardstock
Other Products
  • Glue Pen
* Using the 1 3/8" Circle punch, I punched  3/4" of the circle from the DSP. 
* Using Pumpkin Pie cardstock, I used the 1 3/8" Circle punch and punched out a circle, the circle is not used.  Taking the Scallop Circle punch, center the scallop over the hole in the cardstock, and punch.  This frame was then glue over the punched out area of the DSP (trimming to fit the edge).

Saturday, August 21, 2010

Masculine Thank You

I CASEd this card from a Stampin' Up! Demonstrator, unfortunately, I was not able to back track to find her name (my apologies)

Stampin' Up! Products

  • Sweet Pea Designer Series Paper
    • Cut one piece measuring 5 1/2" x 1 1/4"
    • From this piece cut off 1/4" creating a piece measuring 5 1/2" x 1/4"
  • Stamped image is from the Garden Collage stamp set and measures 2 1/4" x 2"
  • Stamped sentiment "thanks so much" is from the Pocket Silhouettes stamp set
  • Chocolate Chip ink was used for both stamped images
  • Blender Pen using So Saffron and Taken with Teal inks
  • Chocolate Chip cardstock was used for the layer and measures 2 1/2" x 2 1/4"
  • 3/16" Corner Rounder punch was used for the bottom edge of the card and stamped image layers
Other Products
  • White textured cardbase measuring 5 1/2" x 4"

Thursday, August 19, 2010

Scallop Circle Flower - Split Fibers


I created the flower in this picture using So Saffron cardstock and the Scallop Circle punch from Stampin' Up!  I punched out four scallops and using my bone folder, broke down the fibers by using the same motion you do to curl ribbon.  Once the fibers are broken down enough, you can carefully pull the two layers apart. 

Stampin' Up! Products
  • Taken with Teal cardbase measuring 5 1/2" x 4 1/4"
  • Sweet Pea Designers Series Paper measures 5 1/4" x 4"
  • Taken with Teal cardstock measuring 1/2" x 6" was put through the crimper and cut down to fit the 5 1/4" width of the card
  • Flower was made out of So Saffron cardstock
  • Leaves were made out of Old Olive cardstock*
  • Sentiment layers were So Saffron, Old Olive and Taken with Teal cardstock
  • Thank You! sentiment is from the Very Versatile stamp set and was stamped using Taken with Teal ink
  • Scallop Oval, Large Oval and Small Oval punches
  • Crimper
  • Tombo Multi Purpose Adhesive
Other Products
  • Rhinestone brad
To create the leaves, cut one scallop oval and fold in half lengthwise and run it through your crimper at an angle.

Wednesday, August 18, 2010

Friends Never Fade Birthday

Stampin' Up! Products
  • Naturals White cardbase measuring 5 1/2" x 4 1/4"
  • Layer 1:  Elegant Eggplant measuring 5 3/8" x 4 1/8"
  • Layer 2:  Naturals White measuring 5 1/4" x 4"
  • Happy Birthday from the Well Scripted stamp set in Elegant Eggplant ink
  • Flower stamp from the Friends Never Fade stamp was first stamped using Elegant Eggplant ink then using Lavender Lace ink
Other Products
  • 1/4" grosgrain ribbon

Tuesday, August 17, 2010

Happy Birthday Sweet Pea

Stampin' Up! Products
  • Chocolate Chip card base 5-1/2" x 4-1/4" when folded
  • Whisper White cardstock layer 5-1/4" x 2-1/4"
  • Sweet Pea Designer Series Paper 5 1/4" x 2 1/4"
  • 1" Chocolate Chip first run through crimper, then trimmed to correct size
  • Happy Birthday from the Well Scripted stamp set
  • Chocolate Chip ink
  • Brads Epoxy Sending Love Chocolate Chip 1/4" brad
  • Flower from the Big Bold Cupcakes die set in Chocolate Chip
  • Fancy Flower Extra-Large punch in Baja Breeze
  • Dimensionals

Monday, August 16, 2010

Birdhouses - A Thank You Door Prize

Two lucky women are going to win one pair of these adorable birdhouses filled with M&M's. The Adams/Johnston Circle representing the United Methodist Women from First United Methodist Church of Jasper meets once a month. Jane and I decided it would be fun to a monthly door prize drawn from everyone in our circle that attends the UMW General Meeting. We did not meet in July, so Monday's drawing will be for the June and August General meetings.


Stampin' Up! Products
  • Close to Cocoa Patterns Designer Series
  • Close to Cocoa, Chocolate Chip and Sage Shadow cardstock
  • Bigz L Mini Milk Carton die
    • Big Shot
    • Standard Pads
    • Premium Crease Pad
  • Scallop Edge Border, 1/2" Circle and Two-Step Bird Extra-Large punches
  • Basic Black Stampin' Write Marker
  • 1/2" Library Clips
  • Tombow Mono Multi glue
Other Products
  • M&M's candy
  • Argyle embossing folder
  • Clear sheet (to hold candy in bird house)
The roof is first cut at 4" x 2", then scored in half. The bottom edges are cut using the Scallop Edge Border punch and then roof is put through the Big Shot inside an embossing folder.

Margaret H. and Susan B. were the winners of the pair of birdhouses, of course they loved them.  It is so fun GIVING!

Sunday, August 15, 2010

Clean and Simple Stamping Challenge

I was challenged to create a card from the Clean & Simple Stamping blog, using this card map.  This is a good way to create a card from scratch.


Stampin' Up! Products
  • Soft Suede textured cardbase
  • Soft Suede and Very Vanilla Cardstock
  • Soft Suede ink
  • Upsy Daisy stamp set
  • Dimensionals
Other Products
  • 1/4" ribbon
Directions
  • Soft Suede textured cardbase is 5 1/2" x 4 1/4" when folded
  • Stamped image layer is on Very Vanilla cardstock cut at 3-1/8" x 3-3/4"
  • Next layer is Soft Suede cut at 3 3/8" x 4 1/2"
  • A bow is then tied around these two layers
  • Next layer is Very Vanilla cut at 3 5/8" x 4 3/4"
  • Add Dimensionals to these layers and attached to card base

Saturday, August 14, 2010

Your Choice of Sentiments

Using the sentiments from Teeny Tiny Wishes stamp set, I created this gift.  The recipient is able to choose the sentiment they want from happy birthday, With Sympathy, get well wishes, thank you and thinking of you.  The recipient also gets to choose where on the card that they want to put their sentiment embellishment.  I included in this gift set clear adhesive tabs to attach sentiment choice onto embellishment.

 
I found instructions for this cute card holder here.  Please take the time to comment on Carmi's posting to show your appreciation of her sharing her talents with you.

 
Stampin' Up! Products
  • Whisper White card base
  • So Saffron cardstock
  • Stamps from the Teeny Tiny Wishes and Thinking Happy Thoughts were stamped in Bermuda Bay ink
  • 1-1/4", 1-3/8" and Scallop Circle punches
  • Word Window, Modern Label punches and Movers & Shapers Modern Label die
  • So Saffron 5/8" grosgrain ribbon
  • Dimensions
Other Products
  • Coordinating patterned paper
  • Brad
  • Eyelet
  • Strong adhesive 1/2" and 1/8" wide
  • Photo album adhesive tabs
The Modern Label punch and Modern Label die are adhered together and Dimensionals are placed on the back.  All the recipient has to do is peel and stick!

 
Thank you for stopping by my blog - have a great day!

Friday, August 13, 2010

Happy Birthday Butterflies

I am not big on butterflies, but liked Jenn Diercks' card so much I had to CASE it (Copy and Steal Everything....acceptable as long as you give the creator the credit.)
Stampin' Up! Products
  • Apricot Appeal cardstock 5 1/2" x 4 1/4" folded
  • Certainly Celery cardstock layer cut at 5 1/4" x 4"
  • Whisper White cardstock layer cut at 5" x 3 3/4"
  • Happy Birthday from the Vintage Labels stamp set was stamped in Rose Red
  • So Saffron 5/8" grosgrain ribbon
  • Beautiful Wings Embosslit die was used to cut out the Certainly Celery, Apricot Appeal and Rose Red butterflies
  • Mini Glue Dots
Other Products
  • Swiss dot embossing folder
A quite and easy card.

Thursday, August 12, 2010

Crochet Flower

I crochet the flower pictured in this card using DMC embroidery floss.

Stampin' Up! Products
  • Card base:  Whisper White is 5 1/2" x 4 1/4" when folder
  • First Layer:  Rose Red cardstock is cut at 5 1/4" x 4"
  • Second Layers: Sweet Pea Designer Series Paper (DSP), top half cut at 5" x 1 1/2", bottom half cut at 5" x 2"
  • Old Olive cardstock
  • Rose Red ink
  • Rose Red 1/4" grograin ribbon - 6 1/4"
  • Small Oval, Word Window and Modern Label punches
  • Movers and Shapers Modern Label die
  • Crimper
  • Dimensionals
Other Products
  • Embroidery floss
  • Button
  • Medium glue dots

Directions
  1. The DSP used for the top half of the second layer is glued first to the Rose Red cardstock
  2. The DSP used for the bottom half of the second layer is then added, covering a little DSP already affixed to the Rose Red cardstock
  3. Wrap grosgrain ribbon around the front of the layers and glue to the back  (covers the lines where the two different DSP meet.)
  4. The layers are then glued to the card base
  5. To create the leaves, cut out two small oval punches, fold them lengthwise in half.  Using your crimper angle the folded oval through the crimper
  6. Using medium glue dots, add the leaves to the back of your crochet flower
  7. Place medium glue dots behind flower and attach to card
  8. Stamp image onto DSP and punch out using the Word Window punch
  9. Punch a Modern Label out of Old Olive cardstock
  10. Using the Movers & Shapers Modern Label die, cut one out of Rose Red cardstock
  11. Place completed sentiment onto card using Dimensionals

For directions to create the crochet flowers, check out Nicole's blog HERE.  Please take the time to comment on Nichole's posting to show your appreciation of her sharing her talents with you.

Wednesday, August 11, 2010

Houndstooth Embossed Card

Inspired by a card designed by Sherrie Barron, I created this card.


Stampin' Up! Products
  • Riding Hood Red cardbase is 5 1/4" x 8" and then folded
  • Whisper White cardstock is cut at 4 1/4" x 2 1/8"
  • Night & Day Speciality Designer Series Paper (DSP) is cut at 3 7/8" x 1 1/2"
  • Scallop Trim Border punch
  • Riding Hood Red butterfly is cut using the Beautiful Wings Embosslit die
  • Happy Birthday (from the Well Scripted stamp set) is stamped in Basic Black
  • 3/16" Corner Rounder punch
  • Mini Glue Dots
Other Products
  • Ribbon
  • Houndstooth embossing folder

Directions
  1. The card front only is embossed using a houndstooth embossing folder.  A typical folded cardbase measures 5 1/2" x 4 1/4"; however, the embossing folder only accommodates 5 1/4" x 4".  That is one of the benefits of purchasing Stampin' Up! embossing folders, they are designed to emboss the entire card front of a 5 1/2" x 4" folded cardbase.
  2. Top layers - Whisper White cardstock is first cut at 4 1/4” x 2 1/8".  Using the Scallop Trim Border punch, I punched one side and then trimmed it down to 3 7/8" x 2 1/8" so that the punched border is centered perfectly.  I am bit of a perfectionist.
  3. Stamp Happy Birthday in the upper left hand corner
  4. Apply adhesive to the wrong side/bottom edge only of your Whisper White stamped piece.  Attached this piece to the DSP; exposing 3/4" of the DSP
  5. Round all four corners using the corner rounder punch
  6. Using your favorite method*, tie a knot in the ribbon and wrap it around
  7. Apply adhesive to the back of these layers and affix it to your card base
  8. Add a glue dot to the back of the butterfly and affix on card.
*Tying ribbon can be challenging.  I recently discovered two great videos on tying knots and bows.  Darlene created two fantastic videos showing different ways of tying ribbon.  You can view her videos here.  Please take the time to comment on Darlene's blog to show your appreciation of her sharing her talents with you.

Post-it-Note Holder - Tutorial Available

I created a tutorial for my Post-it-Note holder using the Bind-it-All tool.

Stampin' Up! Products
  • Simple Friendship stamp set
  • Kiwi Kiss and Rose Red Stampin' Write markes
  • Raspberry Tart Designer Series Paper
  • Kiwi Kiss, Whisper White and Rose Red cardstock
  • 1 3/4" circle punch
  • Brayer
  • Snail
  • Dimensionals
Other Products
  • 3" x 3" Post-it-Note
  • Bind-it-All tool
  • 1/2" Owires
  • Glue stick
  • Ribbon
Tutorial is available for $2.50.  Upon payment, your tutorial will be sent to you by email. I usually check my account twice a day. The email will be sent to the one you have with Paypal, unless otherwise noted. Thank you.


Monday, August 9, 2010

Bind-it-All Post-it-Note Cover

Quick and Easy Gift

Stampin' Up! Products
  • Simple Friendship stamp set
  • Kiwi Kiss and Lovely Lilac ink and marker
  • Kiwi Kiss and Lovely Lilac cardstock
  • Dimensionals
  • 1 3/4" Circle punch
  • Brayer


Other Products
  • Patterned paper
  • Circle and scallop circle dies
  • Chipboard coasters 4"
  • Bind-it-All Owires
  • Ribbon
  • Glue stick
  • Post-it-Note
  • Nail file
 

Sunday, August 8, 2010

Fan Fold Card

Yes, another Fan Fold card. I like how it adds dimension to a card.


Stampin' Up! Products
  • Summer Picnic Designer Series Paper
  • Bashful Blue and Real Red cardstock
  • Real Red ink
  • Very Versatile stamp set
  • Small, Large and Scallop Oval and 3/4" Circle punches
  • Dimensionals
  • Mini Glue Dots

Other Products
  • 4" scallop circle die
  • Fabric covered brad

My tutorial can be purchased for $2.50.  Upon payment, your tutorial will be sent to you by email. I usually check my account twice a day. The email will be sent to the one you have with Paypal, unless otherwise noted.


Tuesday, August 3, 2010

WEDNESDAY NIGHT LIVE RETURNS

First United Methodist Church
Jasper, Alabama
Wednesday Night Live
IS BACK!

Wednesday, August 18
Fellowship Dinner every Wednesday, August 18
Classes begin Wednesday, August 25

Class Description: See what you can create with paper, ink, stamps, glue and ribbon. In this class you will learn how easy and fun it is to make greeting cards, gift bags and party favors.

Fee: $30, $5 discount if paid by August 22 (All materials supplied, please bring your own adhesive)

Call or email me.

United Methodist Women - Conference School of Christian Missions 2010

HAS BEEN CANCELED

On Saturday, August 28, the United Methodist Women (Southwest District - Alabama) is offering 2010 Mission Series at the First United Methodist Church in Jasper, AL.

There will be three different areas of study, select one from the following:
  • For the Love of God: The Epistles of John (led by Minne Murell)
  • Joy to the World: Mission in the Age of Global Christianity (Led by Karen Bevill)
  • The Beauty and Courage of Sudan (led by Nancy Lane and Pat Ferrell)
Additional Information
  • First United Methodist Church of Jasper is located at 1800 3rd Avenue South,  Jasper, AL 35501 - Click HERE for map
  • Fee:  $0.00
  • 9:00 am - 1:00 pm
  • Light lunch provided
  • To register, email me
  • Childcare provided*
*Please let us know if you will be needing childcare

Please check out the United Methodist Women website - click HERE.

Friday, July 30, 2010

Crisis in Africa

There is a real crisis in Africa that most people are not aware of.


I am asking for your help on a matter that is most urgent to the albinism community. In the last two years, at least 53 people with albinism have been hunted and killed in Tanzania to satisfy followers of widely held folk religions. Practitioners believe that the skin, organs and limbs of people with albinism can be made into potions that can give wealth or luck.

Tanzanians with albinism once had reason to believe that their government would uniformly prosecute the murderers, but recently, most trials have been suspended because of a “lack of funds”. Although prosecution has resumed in certain provinces, justice is by no means widespread or consistent. As a result, people with albinism in Tanzania live in constant fear for their lives, without the assurance of protection or justice.

The National Organization for Albinism and Hypopigmentation (NOAH) is working to put a stop to this horrific practice, and to compel the Tanzanian government to resume uniform prosecution of the murderers. To be more effective, we need your help to increase awareness about the ongoing crisis. I urge you to send a letter to your member of Congress and to your senator, asking them to join the campaign to end this practice. NOAH is seeking members of Congress who would be willing to sponsor a joint resolution calling for action in Tanzania.

Please visit THIS LINK to access a template letter for members of Congress, as well as contact information.

How can you help?  Make a donation to Noah HERE, Under the Same Sun HERE or Asante Mariamu HERE.

To see the beauty in persons with albinism, click HERE.

More information (graphic narration):  20/20 Video

Thursday, July 29, 2010

Fan Fold Card

I created a tutorial on how to make this card.  It isn't complicated and I love the 3D effect.  You can download the tutorial HERE.

Stampin' Up! Products
  • Crumb Cake card base (previously called Kraft)
  • Night of Navy
  • Crumb Cake and Night of Navy Designer Series Paper
  • love you from the Short & Sweet stamp set
  • Scallop Oval, Large Oval and Small Oval hand punches
  • Mini Glue Dots
  • Dimensionals
Other Products
  • Fabric covered brad
  • 4" scallop circle die


Measurements

  • Card base – Crumb Cake – 5 1/2” x 4 1/4”
  • First layer – Night of Navy – 5 1/4” x 4”
  • Second layer – Crumb Cake Designer Series Paper (DSP) – 5” x 3 3/4”
  • Third layer – Night of Navy – 4 1/4” x 2 3/4”
  • Fourth layer – Crumb Cake DSP – 4” x 2 1/2”
  • Fan – Night of Navy DSP – approximately 4” diameter scallop circle die cut
  • Kraft – 3/4” circle punch
  • Embellishment
    • Night of Navy – Scallop Oval
    • Crumb Cake – Large Oval
    • Whisper White – Small Oval

Friday, July 23, 2010

Sunflower Tutorial

As promised, I created a tutorial for the sunflower used in this card.

Supply list for sunflower
  • Cardstock - Scrap pieces in Summer Sun and Chocolate Chip
  • Two-Step Bird Extra-Large punch
  • 1" Circle and 1/2” Circle punches
  • Big Shot machine
  • Perfectly Polka Dots embossing folder
  • Adhesive
  • Pencil
I know you will find my step-by-step instructions easy to follow.  Sunflower Tutorial can be purchased for $2.50.   Upon payment, your tutorial will be sent to you by email. I usually check my account twice a day. The email will be sent to the one you have with Paypal, unless otherwise noted.


If you wish to purchase any of the Stampin' Up! products used in this post, please email me.

Tuesday, July 20, 2010

Masculine Thinking of You

Stampin' Up! Products
  • Soft Suede textured cardstock
    • Cardbase cut at 4 1/4" x 5 1/2"
    • Layer 1 1/2" x 3 1/4"
  • Sahara Sand cardstock
    • 3 1/4" x 5"
  • Whisper White cardstock
    • Card front layer cut at 3" x 5 1/8"
    • Insert layer cut at 4" x 5 1/4"
  • Bermuda Bay textured cardstock, cut at 1 1/4" x 3 1/4"
  • Pocket Silhouettes image stamped three times in Soft Suede ink
    • Once on Whisper White cardstock and then punched using 1 3/4" Circle punch
    • On Whisper White insert layer
    • On Whisper White medium envelope
  • Thinking of You from Three Little Words stamp set in Soft Suede ink
  • Mat Pack for brad placement
Other Products
  • Circle die 1 7/8"
  • Copper brads
All layers except for the cardbase were glued together, brads were the attached before gluing layers onto the card base. 

I CASEd (Copy and Steal Everything from artist)

Sunday, July 18, 2010

You are my sunshine.......

........my only sunshine.  You make me happy

Stampin' Up! Products

  • Kiwi Kiss cardstock 4 1/4" x 5 1/2"  (Please note: you do not use a folded card base.)
  • Whisper White liner is cut at 5 1/4” x 4”
  • Kiwi Kiss scallop section is first cut at 4” x 1 5/8”, then punch one length using the Scallop Edge punch
  • Good Morning Sunshine Designer Series Paper (DSP) is cut at 4” x 1”
  • ...you are my sunshine is from the Something Sweet stamp set - I stamped it using Kiwi Kiss ink
  • Summer Sun cardstock was first embossed using a swiss dot embossing folder, then using the Two-Step Bird Extra Large punch, I punched out eight bird wings
  • Chocolate Chip cardstock was first embossed using a swiss dot embossing folder, then I punched out a circle using the 1" Circle punch
  • Dotto was used to allow for repositioning of flower parts
  • Dimensionals
Other Products
  • Swiss dot embossing folder
Please check back next week when I post a tutorial on how to make the sunflower using the Two-Step Bird Extra-Large Punch

Friday, July 16, 2010

Masculine Thinking of You

I purchased Stampin' Up! Natural White cardstock months ago and this is the first time I have used it.  I wanted to create a masculine thinking of you card (but I don't think I achieved it).
Stampin' Up! Products
  • Natural White card base folded is 4 1/4” wide x 5 1/2” tall
  • Soft Brown layer is first cut at 4” x 4 3/4”, then use a border punch. You may have to trim it down depending on the depth of your border punch – your end result should be 4” x 4 1/2”
  • Thoroughly Modern DSP layer is cut 3 3/4” x 4”
Other Products
  • Burgundy satin ribbon - 5/8"
I have been posting dimensions to my crafting items - I hope you find this useful.

Wednesday, July 14, 2010

Easy Card

Mary Fish is a Stampin' Up! Demonstrator and I admire her work.  Check out her blog HERE.

Inspired by one of her cards, I created this "thinking of you" card.

Stampin' Up! Products
  • Baja Breeze, Certainly Celery and Old Olive cardstock
  • Green Tea Designer Series Paper
  • Old Olive ink
  • thinking of you from Always in My Thoughts stamp set
  • Small Oval, Large Oval, Scallop Oval and Trio Flower punches
  • Dimensionals
Other Products
  • 3/8" grosgrain ribbon
  • rhinestone (iron on)
Measurements
  • Card base folded measures width 4 1/4”, height 5 1/2” (Certainly Celery)
  • Designer Series Paper – 3 3/4” x 4” (Green Tea)
    • Cut into three pieces, each measuring 1 1/4” x 4”
  • Coordinating cardstock A is cut at 1 1/8” x 4” (Old Olive)
  • Coordinating cardstock B is cut at 7/8” x 4” (Baja Breeze)

Tuesday, July 13, 2010

More Post-it-Note Covers

More Post-it-Note covers that I made. These are perfect to put in your purse
Stampin' Up! Products
  • Dusty Durango textured cardstock
  • Crushed Curry and Old Olive cardstock
  • Crushed Curry Patterns Designer Series paper
  • Blooms and Blossoms Sizzix dies
Other Products
  • Post-it-Note
  • Velcro dot
  • Brad
Directions are similar to my tutorial here; however below are the dimensions when using a Post-it-Note pad

Measurements
  • Cover is 3 1/16" x 8 1/2"
  • Scored at 3", 3 3/8", 6 1/2" and 6 7/8"
  • Outside and inside covers, cut cardstock at 2 3/4" x 2 3/4"
  • Next layer - Designer Series Paper at 2 1/2" x 2 1/2"
  • Top flap layers
    • Layer one 1 3/8" x 2 3/4"
    • Layer two 1 1/8" x 2 1/2"
  • Velcro dot is placed on the top flap on the inside
  • Embellishment is placed on the finished product

Monday, July 12, 2010

We Have a Winner

Using http://www.random.org/ and the nine comments on my blog posting:  Scallop Circle Flower Tutorial - Win the journal pictured in this post!!!


Random Integer Generator

Here are your random numbers:
7


The winner is:  Rita


Rita said...

Those are gorgeous! I love the colors on these projects!
July 7, 2010 8:13 PM

Thank you everyone for participating in my first blog giveaway!

Post-it-Note Covers


Here are a few Post-it-Note covers that I made.  These are perfect to put in your purse


Stampin' Up! Products
  • Almost Amethyst textured cardstock
    • Pretty in Pink and Certainly Celery cardstock
    • Fancy Flower Extra Large and Boho Blossoms punches
    • Cherry Blossom Embosslits
    • Tea Party Designer Series Paper


  • Cameo Coral textured cardstock
    • Kiwi Kiss cardstock
    • Boho Blossoms, Scallop Circle, 1 1/4" and 1 3/8" Circle punches
    • With All My Heart stamp set
    • Cameo Coral ink
    • Raspberry Tart Designer Series Paper


    • Bermuda Bay textured cardstock
      • Pretty in Pink and Melon Mambo cardstock
      • Scallop Circle, 1", 1 1/4" and 1 3/8" Circle punches
      • Welcome Neighbor Designer Series Paper


    Other Products
    • Post-it-Notes (3" x 3")
    • Velcro dot
    • Flower brad
    • Small brad
    Directions are similar to my tutorial here; however below are the dimensions when using a Post-it-Note pad
    1. Cover is 3 1/16" x 8 1/2"
    2. Scored at 3", 3 3/8", 6 1/2" and 6 7/8"
    3. Outside and inside cover, cut Designer Series Paper at 2 3/4" x 2 3/4"
    4. Top flap layers
      1. Layer one 1 3/8" x 2 3/4"
      2. Layer two 1 1/8" x 2 1/2"
    5. Velcro dot is placed on the top flap on the inside
    6. Embellishment is placed on the finished product

    Sunday, July 11, 2010

    Michaels Dollar Bin Notepads

    I just love Michaels dollar bin notepads.  For $1.00 you receive two notepads, and with a little cardstock, you can turn them into cute little gifts.  These are PERFECT to carry in your purse.

    I created a tutorial - quick and easy!  You can purchase it below.  Please note that not all sticky notes purchased at Michaels are the exact same dimensionals; the pads you purchased may have more or less sheets.  You will have to refine the tutorial to match the pads you purchased.

    Stampin' Up! Products
    • Almost Amethyst textured cardstock
    • Pretty in Pink, Certainly Celery and Whisper White cardstock
    • Tea Party Designer Series Paper
    • Lovely Letters Alphabet stamp set
    • Certainly Celery ink
    • Hand punches – 1 1/4”, 1 3/8” and Scallop Circle
    Other Products
    • Michaels dollar bin notepads
    • Velcro dot
    Michael's Dollar Bin Sticky Notepads Tutorial is $2.50.  Upon payment, your tutorial will be sent to you by email. I usually check my account twice a day. The email will be sent to the one you have with Paypal, unless otherwise noted. 


    Thank you.

    Saturday, July 10, 2010

    CD Envelope Pocket Album Purse

    When I discovered a tutorial by Maria Bell on creating an album purse, I just had to recreate it.  Of course, it took me all morning, which I enjoyed.   Thank you Maria for creating this tutorial and posting it FREE for everyone to enjoy.

    Stampin' Up! Products
    • Sage Shadow textured cardstock
    • Really Rust and More Mustard cardstock
    • Autumn Vine Designer Series paper (DSP)
    • Really Rust, More Mustard and Sage Shadow ink
    • Scallop Circle, Boho Blossoms and Round Tab hand punches
    • Refuge and Strength stamp set
    • Seasons of Friendship (leaves)
    Other Products
    • 5/8" satin ribbon - brown
    • copper brads
    • white eyelets
    • cd sleeve
    • velcro dot
    • strong adhesive
    What I would do differently
    • Instead of stamping on the cd envelope, I would have used DSP and cut a 4" circle in the middle and glued it to the front of the cd envelope.  I would cut the DSP at 4 7/8" x 4 7/8"
    • I had difficulty using the 1" round punch to make a indented tab, the clear cellophane inside the cd wrapper would not punch, so I omitted this.  After completing the album I discovered the if you put a piece of scrap paper on the inside, next to the cellophane, the punch will work.  The album definitely needs the half round cutout.
    *I was very disappointed in my purchase of the Memorex cd sleeves.  Memorex packaged the sleeves with a rubber band around them; this left the first 10 sleeves in the front and in the back of the package unuseable if you intended on stamping on the front.

    Friday, July 9, 2010

    Bind it All - Reusable - Magnetic Notepad

    I purchased magnetic notepads last year at a great price and wanted to create a more decorative cover.  After some consideration I thought that the cover would be more useful if it was "refillable".  I started lacing ribbon in, out and around the two covers that I bound together with my Bind-it-All and found a way to tie a decorative knot on the front and have the ribbon hold the notepad in place to the back cover.

    Stampin' Up! Products
    • Rich Razzleberry Patterns Designer Series paper
    • Rich Razzleberry cardstock and ink
    • Whisper White cardstock
    • Friends Never Fade stamp set
    Other Products
    • Bind-it-all Owires - 1/2"
    • 5/8" white grosgrain ribbon
    Measurements
    • Cardboard - 8 1/4" x 4 1/2"
    • Outside covers - 9 3/4" x 6"
    • Inside covers - 8 1/4" x 4 1/2"
    • Stamped image (layer one) - 1 7/8" x 2 1/2"
    • Layer two - Rich Razzleberry - 2 1/8" x 3 3/4"
    • Layer three - Whisper White - 2 1/4" x 3 7/8"
    • Layer four - Rich Razzleberry - 2 1/2" x 4 1/8"