Tuesday, March 22, 2022

How Did She Do That?


Hmmm...how did she do that?

I've said it many times, I love layers! I wanted to make a card using this card map. My layout would begin with a typical A2 card base. My next layer (A, usually a solid cardstock) would be 4" x 5 1/4". The final layer would be 3 7/8" x 5 1/8".* However how do I measure and cut the angles of the small strip of paper. perfectly? I can't attach the top and bottom layers to card layer A which is 1/8" wide and attach the strip with guesstimated angles. 

March 20th post....


 My solution.....

  • Cut from a scrap of cardstock measuring 3 7/8" x 5 1/8". This will be used as a template and will not become part of the actual card.
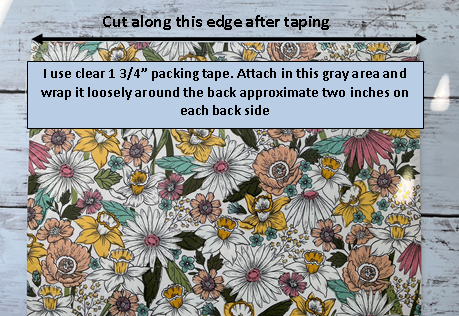
  • Attach the bottom piece with a little length of tape runner. You will need to remove tape later.


  • Attach the top piece with a little tape runner. You will need to remove the tape later.


  • Attach your strip, taping or gluing the entire strip to the two pieces.


  • Trim off the strip.
  • Carefully remove entire front section from card template. 
  • Glue to card layer 4" x 5 1/4"


Sunday, March 20, 2022

Thank You Kindly


Stampin' Up! Products
  • Fresh Freesia cardstock
    • Card base measures 4 1/4" x 11"
      • Scored at 5 1/2"
  • Basic Black cardstock
    • Card layer measures 4" x 5 1/4"
    • Card strip measures 6 1/4" x 3/8"
      • Crimp, slightly flatten and attach with strong adhesive
    • Card layer (inside) measures 4" x 5/8"
  • Basic White cardstock
    • Card layer (inside) measures 4" x 5 1/4"
    • Scrap for circle
  • Scrap cardstock
    • Card layer measures 3 7/8"x 5 1/8"
  • Friendly Hello Designer Series Paper
    • Top layer measures 3 7/8" x 3 7/8"
      • Measure down 1 1/2" from top, right-hand side
      • Cut diagonally to bottom left corner
    • Bottom layer measures 3 7/8" x 3 5/8"
      • Measure up 1 1/4" from bottom, left-hand side
      • Cut diagonally from bottom to top right corner
    • Card layer (inside) measures 4" x 1/2"
  • Delicate Dahlias stamp set
  • Memento Tuxedo black ink
  • Brilliant Wings dies
  • Stitched circle dies (non SU)
  • Pearl Basic Jewels
  • Dimensionals
The diagonal strip lines up with the DSP 3 7/8" width, not the BB 4" x 5 1/4" layer. This looks more professional. How did I do that? Check back on March 22 for an easy how to.

Friday, March 18, 2022

Friendship - Modified Gate Fold


Stampin' Up! Products
  • Mint Macaron cardstock
  • Flirty Flamingo cardstock
  • Very Vanilla cardstock
  • Daffodil Afternoon Designer Series Paper
  • Beauty Abounds stamp set
  • Memento Tuxedo black ink
  • Brilliant Wings and Stitched So Sweetly dies
  • Pearl Basic Jewels
    • Dyed to match


Wednesday, March 16, 2022

Feel Better Magnolia


Stampin' Up! Products
  • Always Artichoke (or Mossy Meadow) cardstock
  • Petal Pink cardstock
  • Whisper White cards Rockne’s 
  • Whisper White envelope
  • Magnolia Lane Designer Series Paper
  • Good Morning Magnolia and Hand-Penned Petals stamp sets
  • Memento Tuxedo Black and Mossy Meadow inks
  • Stampin' Blends
    • Mossy Meadow
    • Petal Pink
    • Soft Suede
    • So Saffron
  • Magnolia Memory dies
  • Wink of Stella Clear
  • Dimensionals
  • Sequin

Don't be tempted to glue this underneath the Petal Pink 4" x 5 1/4" piece. The thickness of the cardstock may leave an impression that you can see from the inside of the card. BTDT


Monday, March 14, 2022

Happy Anniversary


Stampin' Up! Products
  • Seaside Spray cardstock
    • Card base measures 7 1/2" x 5 1/2"
      • Scored at 4 1/4"
    • Scrap for butterfly and  5/8" sentiment mat
  • Night of Navy cardstock
    • Card layer measures 3" x 5 1/4"
    • Card layer (inside) measures 4" x 5 1/4"
    • Scrap for butterfly and 3/4" sentiment mat 
  • Whisper White cardstock
    • Card layer (inside) measures 2 7/8" x 5 1/8"
    • Scrap for sentiment, finished measures 3 1/8" wide
  • Garden Impressions Designer Series Paper
    • Card layer measures 2 7/8" x 5 1/8"
    • Card layer (inside) measures 7/8" x 5 1/8"
  • Express Yourself stamp set
  • Memento Tuxedo black ink
  • Brilliant Wings dies
  • Lovely Labels Pick a punch
  • Pearl Basic Jewels
  • Dimensionals


Thursday, March 10, 2022

Magnolia Friendship


Stampin’ Up, Products
  • Always Artichoke or Mossy Meadow cardstock
  • Petal Pink cardstock
  • Whisper White cardstock
  • Magnolia Lane Designer Series Paper
  • So Sentimental stamp set
  • Memento Tuxedo Black ink
  • Stampin' Blends
    • Mossy Meadow
    • Petal Pink
    • Soft Suede
  • Magnolia Memory dies
  • Wink of Stella Clear
  • Pearl Basic Jewels
  • Dimensionals

Tuesday, March 8, 2022

Hello Ladybug Fun Fold Card Series

Introducing Hello Ladybug Fun Fold Card Series
Cascade Tri Fold


You definitely will want to purchase the adorable Hello Ladybug stamp set and coordinating Ladybug Builder Punch!

I have started on a Ladybug Fun Fold Card Series. This series will include the following Fun Folds: Bridge Card, Cascade Tri Fold, Double Z Fold, Tent Easel Card, Tri Fold and more. All but one card will be a fun fold. Be sure to subscribe so you don't miss the post.

I will be using different Designer Series Paper that is either black and white or red and white. You should be able to find these combinations in  your stash. I use other stamp sets for sentiments in addition to the Hello Ladybug stamp set. The inks are Memento Tuxedo Black, Old Olive and Real Red.


Sunday, March 6, 2022

Bookbinding Diamond Easel Card

ookbinding Diamond Easel Card
Fun Fold

Stampin' Up! Products
  • Very Vanilla Thick cardstock
  • Dapper Denim cardstock
  • Eastern Palace Designer Series Paper
  • Dandelion Wishes, Dragonfly Garden and Forever Lovely stamp sets
  • Dapper Denim and Versamark inks
  • White embossing folder
  • Dragonflies punch
  • Black jewels
  • Dimensionals


The tutorial is only available with a $25 or more Stampin' Up! product purchase using my Hostess Code. My Hostess Code can be found at the top right of blog (desktop version).  EMAIL me if you are having trouble finding my current Hostess Code.

If you use a personal stamp for the back of your cards, think carefully which direction to stamp in relationship to this easel card. BTDT!

Saturday, March 5, 2022

Friends of a Feather


Stampin' Up! Products
  • So Saffron cardstock
  • Basic White cardstock
  • Old Olive cardstock
  • Bird Ballad Designer Series Paper
  • Friends of a Feather stamp set
    • Paper Pumpkin October 2018
  • Memento Tuxedo black ink
  • Stampin' Blends
    • Crumb Cake
    • Daffodil Delight
    • Old Olive
    • So Saffron
  • Rhinestones
  • Dimensionals
The tutorial for this is only available with a $25 or more Stampin' Up! product purchase using my Hostess Code. My Hostess Code can be found at the top right of blog (desktop version).  EMAIL me if you are having trouble finding my current Hostess Code. The tutorial can be purchased for $3.95.


Friday, March 4, 2022

Beauty of the Earth


Stampin' Up! Products
  • Rich Razzleberry cardstock
    • Card base measures 5 1/2" x 8 1/2"
      • Scored at 4 1/4"
    • Card layer (inside)) measures 5/8" x 4"
    • Scrap for flowers
  • Basic White cardstock
    • Card layers measure 5 1/4" x 4" (cut two)
  • Beauty of the Earth Designer Series Paper
    • Card layer measures slightly smaller than 5 1/4" and 4"
  • Good Morning Magnolia stamp set
  • Rich Razzleberry ink
  • Lasting Elegance dies
  • Itty Bitty Accents punch
  • Pearl Basic Jewel

Wednesday, March 2, 2022

Just a Note

If you like this card, check out my Expressions in Ink Tutorial
Click HERE for more information

Stampin' Up! Products
  • Melon Mambo cardstock
    • Card base measures 4 1/4" x 11"
      • Scored at 5 1/2"
  • Basic Black cardstock
    • Card layer measures 4" x 5 1/4"
    • Scrap for scallop die cut
  • Whisper White cardstock
    • Card layer (inside) measures 4" x 5 1/4"
    • Die cut circle is approximately 2 5/8"
    • Scrap for flowers and leaves
  • Expressions in Ink Designer Series Paper
  • Artistically Inked and Flourishing Phrases stamp sets
  • Melon Mambo, Memento Tuxedo black, and Shaded Spruce inks
  • Artistic and Layering Circle dies
  • Gold rhinestones
  • Black crochet thread
  • Dimensionals

Monday, February 28, 2022

Special Moments Bookbinding Triangle Fancy Fold


Stampin' Up! Products
  • Fresh Freesia
  • Basic Black
  • Basic White
  • Soft Succulent cardstock
  • Friendly Hello Designer Series Paper
  • Friendly Hello and Special Moments stamp sets
  • Memento Tuxedo black ink
  • Rhinestones
  • Dimensionals

Saturday, February 26, 2022

You Are Loved


Stampin' Up! Products
  • Mossy Meadow cardstock
  • Basic White cardstock
  • Flirty Flamingo cardstock
  • Fine Art Floral Designer Series Paper
  • Rich Razzleberry ink
  • Layering Oval dies
  • Itty Bitty Accents punch
  • Sprig punch (non SU)
  • Pearl Basic Jewel
    • Dyed with Night of Navy Stampin' Blends


Thursday, February 24, 2022

Blooms in Leaves - Modified Gate Fold Card


Stampin' Up! Products
  • Mossy Meadow cardstock
  • Petal Pink cardstock
  • Very Vanilla cardstock
  • Designer Series Paper
  • Botanical Prints, Friendly Hello and Thoughtful Blooms stamp sets
  • Memento Tuxedo black ink
  • Lovely Flower Edgelits and Stitched So Sweetly dies
  • Small Bloom punch
  • Pearl Basic Jewels
    • Three small pearls dyed black
  • Dimensionals
I used a Brother Scan N Cut machine to die cut the leaves.


I took Connie Stewart's Gate Fold Card and made it my own. If you are a blog follower you know I prefer using more layers on my card. Check out Connie's YouTube HERE.

Tuesday, February 22, 2022

SHOW OFF - Part 2

Show off your beautiful Designer Series Paper

Stampin' Up! Products
  • Night of Navy cardstock
    • Card base measures 5 1/4" x 5 1/2"
      • Scored at 1"
    • Scrap for fern
  • Misty Moonlight cardstock
    • Scrap for fern
  • Very Vanilla cardstock
    • Card layer measures 3/4" x 5 1/4"
    • Card layer (inside) measures 4" x 5 1/4"
    • Circle is approximately 2 3/8"
    • Scrap for fern and base
  • Boho Indigo Medley Designer Series Paper
    • Card layer measures 5 1/8" x 5 1/8"
      • Cut a layer measuring 5/8" x 5 1/8" from this piece
      • Cut next layer measures 3 7/8" x 5 1/8"
      • Remaining card layer (inside) measures 5/8" x 5 1/8"
  • Boho Vases and Party Pants stamp sets
  • Night of Navy ink
  • Boho Indigo and Layering Circle dies
  • Very Vanilla Taffeta 1/4" ribbon
  • Dimensionals


Friday, February 18, 2022

Bouquet of Hope


Stampin' Up! Products
  • Very Vanilla cardstock
    • Card base measures 8 1/2" x 5 1/2"
      • Scored at 4 1/4"
    • Card layers measures 3 7/8" x 5 3/8" (cut two)
      • Front and inside
    • Scrap for sentiment
  • Evening Evergreen cardstock
    • Scrap for flowers
  • Soft Succulent cardstock
    • Card layer measures 4" x 5 1/4"
    • Scrap for sentiment mat
  • Bouquet of Hope stamp set
    • Paper Pumpkin - February 2021
  • Soft Succulent ink
  • Layering Ovals, Lasting Elegance and Stitched So Sweetly dies
  • Itty Bitty accent punch
  • Pearl Basic Jewels

Wednesday, February 16, 2022

Show Off! - Part 1

Show off your Stampin' Up! Designer Series Paper

Show off your beautiful Designer Series Paper

Stampin' Up! Products
  • Rich Razzleberry cardstock
    • Card base measures 5 1/4" x 5 1/2"
        • Scored at 1"
    • Scrap for butterfly 
  • Sweet Sugarplum cardstock
    • Card layer (inside) measures 5/8" x 5 1/8"
    • Scrap for butterfly
  • Whisper White cardstock
    • Card layer (inside) measures 3 7/8" x 5 1/8"
    • Scrap for sentiment
  • Petal Garden Designer Series Paper
    • Card layer measures 4 3/4" x 5 1/4"
      • Cut a layer measuring 3/4" x 5 1/4" from this piece
      • Remaining layer measures 4" x 5 1/4"
    • Card layer (inside) measures 1/2" x 5 1/8"
    • Scrap for sentiment mat
  • Botanical Prints stamp set
  • Rich Razzleberry ink
  • Brilliant Wings dies
  • Oval and Scallop Oval punches
  • Pearl Basic Jewels
  • Sequins
  • Dimensionals

Monday, February 14, 2022

A Happy Valentine's Day Present for You - Beth's Top Ten Tips

I have found the following the best tips I can pass on as a card maker.
  • Die-cutting cutting pads, two pads + a little extra time = NO WARPING!
    • Use one pad as the bottom pad - where the die cuts into the pad
    • Use one pad that NEVER gets die cut into, label it DO NOT CUT
    • Every other pass through your die cut machine, rotate and flip your pads. Don't switch pad positions, just flip and rotate the pads. 
    • EVERY OTHER PASS THROUGH is the key.  Yes it takes time, but so worth the money. Now you have more money to spend on Stampin' Up! Products.  You're welcome!
  • Cutting your 12" x 12" Designer Series Paper
    • If you need a 3 7/8" layer for one card, cut the DSP at 4" x 12". It is more likely you will use the remaining 4" piece on another project.
    • If  you need a 2 7/8" layer for one, cut the DSP at 3" x 12". It is more likely you will use the remaining 3" piece of another project
  • Storing your Designer Series Paper with scraps
    • Before opening your DSP, loosely apply clear packing tape as indicated here. Wrap it around the back just 2" on each side. This allows you to keep your DSP together along with the scraps in the original package. Keep the thicker white cardstock that your DSP comes in for stability while it is stored. I place scraps smaller than 12" x 6" pieces in the back behind the thicker white cardstock.
    • I also tape my 8 1/2" x 11" cardstock this way
    • Create a file type label with any punch you have.  Attach it to a 12" x 12" piece of heavy cardstock. My DSP is filed alphabetically in an armoire. 


  • Color Combinations
    • Check the back of a package of SU DSP, the colors that coordinate well are listed there. You don't have to use the DSP to know what colors coordinate.
    • Color Coordinating for Dummies - my favorite website, Create, Ink, Color Lab
  • Know What You Have
    • Create a digital document with digital pictures of your stamps and dies
    • Add in descriptions
    • Use the "search" feature in that document
    • Check out one page of my stamp inventory HERE
  • Stampin' Up! now includes a reverse image of the stamp set on the inside of their cases. Make all your older stamp cases look the same!
    • I use to save the left over rubber in the case so it was easy to make sure I had returned all the stamps to the case.  Doesn't work for the new stamps. I needed an easy way to insure that I placed all the stamps back.  I scanned the front of the Stampin' Up! image sheet and flipped the picture so I could insert it into the back of the case.  Added my stamps, and WOW I'm a genius! Some computer skills are necessary. The step by step picture tutorial can be downloaded HERE.
  • Cling Mount Stamp Labels - Don't throw away the scraps.
    • The new Stampin' Up! cling mount stamps now STAY on your acrylic blocks.  Why not make your older Clear Mount stamps STAY by using the scraps?! 
  • Try Before You Buy Make
    • Use some of your long forgotten DSP that you really don't like but can't part with, use it to create samples. 
    • When I challenge myself to make fun fold cards, I also use scrap cardstock and pattern paper.  I design the layout and cut my cardstock.  If I like a style, I write down the card measurements and keep them together for future use.  Look at the messy way I keep this tip.

  • Ribbon Embellishments - Do you struggle like I do making your ribbon embellishment behind a sentiment?
    • I use Press'n Seal to create ribbon and flower layout designs.  Simply create your ribbon zigzag, with the sticky side down of the Press'n Seal, apply that to your ribbon.  Apply adhesive to where you want to place the embellishment and press your work onto your card.  Gently pull back the Press'n Seal and presto - truly a work of art.
 

  • Getting it Straight
    • Place a Silicone Craft Sheet on top of the  layer to prevent adhesive such like Dimensionals from being placed crooked on your card.  Move the craft sheet as you slowly attach the card layer


Saturday, February 12, 2022

The Bookbinding Triangle Fancy Fold


Stampin' Up! Products
  • Very Vanilla Thick cardstock
  • Basic Gray cardstock
  • Very Vanilla cardstock
  • Simply Elegant Designer Series Paper
  • Flourishing Phrases stamp set
  • Memento Tuxedo black ink
  • Decorative Label
  • Black jewels
  • Mini Dimensionals

The tutorial is only available with a $25 or more Stampin' Up! product purchase using my Hostess Code. My Hostess Code can be found at the top right of blog (desktop version).  EMAIL me if you are having trouble finding my current Hostess Code.


Tuesday, February 8, 2022

Quick and Easy Note Cards


Stampin' Up! Products
  • Whisper White Thick cardstock
    • Card base measures 5" x 7"
      • Scored at 3 1/2"
  • Rococo Rose cardstock
    • Card layer measures 4 3/8" x 2 7/8"
  • Whisper White cardstock
    • Card layer measures 4 1/4" x 2 3/4"
  • Delicate Dahlias stamp set
  • Memento Tuxedo black and Rococo Rose inks
  • Stamparatus
  • Pearl Basic Jewels