Saturday, March 4, 2023

Helpful Tips

Let's take a walk back memory lane and revisit my post on February 14, 2022 which my new subscribers may have missed.  These tips still hold true today! I have found the following the best tips I can pass on as a card maker.
  • Die-cutting cutting pads, two pads + a little extra time = NO WARPING!
    • Use one pad as the bottom pad - where the die cuts into the pad
    • Use one pad that NEVER gets die cut into, label it DO NOT CUT
    • Every other pass through your die cut machine, rotate and flip your pads. Don't switch pad positions, just flip and rotate the pads. 
    • EVERY OTHER PASS THROUGH is the key.  Yes it takes time, but so worth the money. Now you have more money to spend on Stampin' Up! Products.  You're welcome!
  • Cutting your 12" x 12" Designer Series Paper
    • If you need a 3 7/8" layer for one card, cut the DSP at 4" x 12". It is more likely you will use the remaining 4" piece on another project.
    • If  you need a 2 7/8" layer for one, cut the DSP at 3" x 12". It is more likely you will use the remaining 3" piece of another project
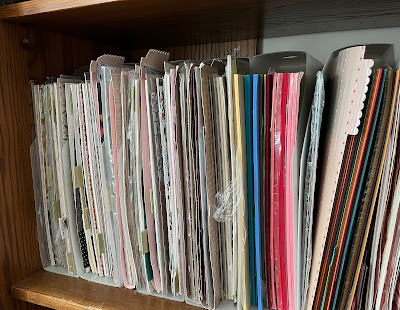
  • Storing your Designer Series Paper with scraps
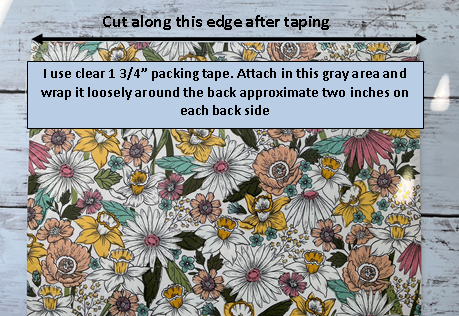
    • Before opening your DSP, loosely apply clear packing tape as indicated here. Wrap it around the back just 2" on each side. This allows you to keep your DSP together along with the scraps in the original package. Keep the thicker white cardstock that your DSP comes in for stability while it is stored. I place scraps smaller than 12" x 6" pieces in the back behind the thicker white cardstock.
    • I also tape my 8 1/2" x 11" cardstock this way
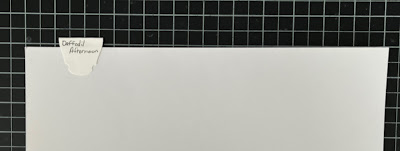
    • Create a file type label with any punch you have.  Attach it to a 12" x 12" piece of heavy cardstock. My DSP is filed alphabetically in an armoire. 


  • Color Combinations
    • Check the back of a package of SU DSP, the colors that coordinate well are listed there. You don't have to use the DSP to know what colors coordinate.
    • Color Coordinating for Dummies - my favorite website, Create, Ink, Color Lab
  • Know What You Have
    • Create a digital document with digital pictures of your stamps and dies
    • Add in descriptions
    • Use the "search" feature in that document
    • Check out one page of my stamp inventory HERE
  • Stampin' Up! now includes a reverse image of the stamp set on the inside of their cases. Make all your older stamp cases look the same!
    • I use to save the left over rubber in the case so it was easy to make sure I had returned all the stamps to the case.  Doesn't work for the new stamps. I needed an easy way to insure that I placed all the stamps back.  I scanned the front of the Stampin' Up! image sheet and flipped the picture so I could insert it into the back of the case.  Added my stamps, and WOW I'm a genius! Some computer skills are necessary. The step by step picture tutorial can be downloaded HERE.
  • Cling Mount Stamp Labels - Don't throw away the scraps.
    • The new Stampin' Up! cling mount stamps now STAY on your acrylic blocks.  Why not make your older Clear Mount stamps STAY by using the scraps?! 
  • Try Before You Buy Make
    • Use some of your long forgotten DSP that you really don't like but can't part with, use it to create samples. 
    • When I challenge myself to make fun fold cards, I also use scrap cardstock and pattern paper.  I design the layout and cut my cardstock.  If I like a style, I write down the card measurements and keep them together for future use.  Look at the messy way I keep this tip.

  • Ribbon Embellishments - Do you struggle like I do making your ribbon embellishment behind a sentiment?
    • I use Press'n Seal to create ribbon and flower layout designs.  Simply create your ribbon zigzag, with the sticky side down of the Press'n Seal, apply that to your ribbon.  Apply adhesive to where you want to place the embellishment and press your work onto your card.  Gently pull back the Press'n Seal and presto - truly a work of art.
 

  • Getting it Straight
    • Place a Silicone Craft Sheet on top of the  layer to prevent adhesive such like Dimensionals from being placed crooked on your card.  Move the craft sheet as you slowly attach the card layer


Favored Flowers Designer Series Paper - Fun Card Layout


This card layout is available three different ways.
  1. FREE - Your $50 Stampin' Up! product purchase using my Current Hostess Code
  2. FREE - Purchase my Favored Flowers Designer Series Paper Tutorial - more information HERE. You receive the tutorial for this card layout and many more with this twelve thirteen fourteen FIFTEEN card tutorial.
  3. Tutorial for this card layout only $3.95 through Buy Now button below

Stampin' Up! Products
  • Fresh Freesia cardstock
  • Basic White cardstock
  • Blackberry Bliss cardstock
  • Mossy Meadow cardstock
  • Favored Flowers Designer Series Paper
  • Charming Sentiments stamp set
  • Blackberry Bliss ink
  • Sentiment Silhouettes dies
  • Itty Bitty Accents punch
  • Sprig punch (non SU)
  • Pearl Basic Jewels

Friday, March 3, 2023

Regency Park Wings


Stampin' Up! Products
  • Night of Navy cardstock
    • Card base measures 5 1/2" x 8 1/2"
      • Scored at 4 1/4"
  • Basic White cardstock
    • Card layer (inside) measures 5 1/4" x 4"
    • Banner measures 2 3/4" x 7/16"
  • Soft Succulent cardstock
    • Card layer measures 4 5/8" x 3 3/8"
    • Card layer (inside) measures 5/8" x 4"
  • Regency Park Designer Series Paper
    • Card layer measures 4 1/4" x 3 1/8"
      • Cut strips each measuring 1 3/8" x 3 1/8"
    • Card layer (inside) measures 1/2" x 4"
  • Art Gallery and Dragonfly Garden stamp sets
  • Night of Navy ink
  • Brilliant Wings dies
  • Dragonflies and Happy Labels Pick a Punch punches
  • Rhinestones
  • Dimensionals

Thursday, March 2, 2023

Favored Flowers Diagonal Cut Layout - Tutorial Bonus Card #15


This is a bonus card added to my Favored Flowers Designer Series Paper Tutorial. The tutorial was originally twelve cards; now it contains thirteen fourteen FIFTEEN card designs. Click 
HERE for more information. The FIFTEEN card design tutorial is now $12.95

Stampin' Up! Products
  • Very Vanilla cardstock
  • Calypso Coral cardstock
  • Evening Evergreen cardstock
  • Favored Flower Designer Series Paper
  • Frame Florets stamp set
  • Evening Evergreen ink
  • Brilliant Wings dies
  • Pearl Basic Jewels
  • Dimensionals

Wednesday, March 1, 2023

Sending Hugs Fun Fold


Stampin' Up! Products

  • Very Vanilla Thick cardstock
    • Card base measures 8 1/2" x 5 1/2"
      • Scored at 2 1/8" and 4 1/4"
    • Card layer (inside) measures 3" x 4 1/4"
    • Finished banner measures 3 1/4" x 1/2"
  • Flirty Flamingo cardstock
    • Card layer measures 1 7/8" x 5 1/4"
    • Card layer measures 3 1/8" x 4 3/8" (cut two)
    • Finished banner measures 3 3/8" x 5/8
  • Daffodil Afternoon Designer Series Paper
    • Card layer measures 1 3/4" x 5 1/8"
    • Card layer measures 3" x 4 1/4"
  • Expressions of Color stamp set
    • Paper Pumpkin - June 2022
  • Memento Tuxedo Black ink
  • Flower and leaf dies (non SU)
  • Banner Pick a Punch
  • Pearl Basic Jewel
  • Dimensionals

Tuesday, February 28, 2023

Standing Step Fun Fold Card made SUPER EASY - Leap Year Card #29

It's My Party Panda Series Finale - Card #29 (Leap Year)

Have you ever spent hours trying to cut out a Step Card Fun Fold only to find that after you completed it, it doesn't stand up? Not anymore! This is not your complicated step fun fold with score lines and cut lines within the score lines. This is SUPER EASY! My tutorial has two layout options along with instructions on how to cut you DSP keep the pattern consistent across the entire card.
Click HERE for more Standing Step Fun Fold Card ideas.

This is Option Two

Stampin' Up! Products
  • Basic Black cardstock
  • Basic White cardstock
  • Melon Mambo cardstock
  • It's My Party Designer Series Paper
  • Balloon Celebration, Guy Greetings and Party Panda stamp sets
  • Melon Mambo and Memento Tuxedo Black inks
  • Balloon Celebration punch
    • Stamp and punch two for added strength
  • It's My Party Enamel Dots
  • White crochet thread (shows up better than black)
  • Wink of Stella Clear

It's My Party Panda Series - Card #28


Stampin' Up! Products
  • Basic Black cardstock
    • Card base measures 5 1/2" x 8 1/2"
      • Scored at 4 1/4"
  • Basic White cardstock
    • Card base (inside) measures 4" x 5 1/4"
    • Scrap for pandas
  • Crumb Cake cardstock
    • Card layer measures 3 7/8" x 1"
  • Melon Mambo cardstock
    • Scrap for balloon*
  • Mint Macaron cardstock
    • Card layer measures 5 1/4" x 4"
    • Card layer (inside) measures 5/8" x 5 1/4"
    • Finished banner measures 2" x 3/8"*
    • Scrap for balloon*
  • It's My Party Designer Series Paper
    • Card layer measures 5 1/8" x 3 7/8"
    • Card layer (inside) measures 1/2" x 5 1/4"
  • Balloon Celebration and Party Pandas stamp sets
  • Crumb Cake, Crushed Curry, Melon Mambo, Memento Tuxedo Black and Mint Macaron inks
  • Stampin' Blends alcohol markers
  • Wink of Stella Clear
  • Balloon Bouquet and Banner Pick A Punch punches
  • Black embroidery thread
  • Dimensionals
* Before stamping balloon and banner, coat cardstock with Wink of Stella. This keeps the dye from the ink from transferring to the brush tip. BTDT. Let the cardstock dry before stamping with ink

Monday, February 27, 2023

It's My Party Panda Series - Card #27


Stampin' Up! Products
  • Basic Black cardstock
    • Card base measures 5 1/4" x 4"
  • Basic White cardstock
    • Card layer (inside) measures 5 1/4" x 4"
    • Scrap for panda
  • Crushed Curry cardstock
    • Finished banner measures 1 3/4" x 3/8"
  • Melon Mambo cardstock
    • Card layer measures 5 1/4" x 4"
    • Card layer (inside) measures 5/8" x 4"
  • Mint Macaron cardstock
    • Strip measures 5 3/4" x 3/8"
      • Crimp and flatten
  • White Full Sheet Labels 
    • Begin with a piece 5 1/2" x 2 1/2" 
      • After attaching strips, run it through a Big Shot with some cardstock. This gives a more secure bond to the label sheet
      • Mark the center of your design at 2 3/4"
        • Find the center of the 5 1/2" wide - which is 2 3/4". Trim down from each side by 3 1/16" 
      • Rough up using a nail file the back side of this label for better adhesion before attaching the cardstock
  • It's My Party Designer Series Paper
    • Strips measure 4 3/4" x 1", cut diagonally
      • If  you have a directional pattern you will only get 1 strip out of this piece
        • I traced one strip to get the smaller pieces needed at the outside edges
    • Card layer (inside) measures 1/2" x 4"
  • Party Pandas stamp set
  • Memento Tuxedo Black ink
  • Stampin' Blends alcohol markers
  • Wink of Stella Clear
  • Banner Pick a Punch
  • Gold rhinestones
  • Dimensionals

Sunday, February 26, 2023

It's My Party Panda Series - Card #26

Stampin' Up! Products
  • Melon Mambo cardstock
    • Card base measures 8 1/2" x 5 1/2"
      • Scored at 4 1/4"
    • Outside ring of circle measures 3" x 3"
    • Card layer (inside) measures 4" x 1/2"
    • Scraps for heart confetti
  • Crushed Curry cardstock
    • Scraps for heart confetti
  • Mint Macaron cardstock
    • Card layer measures 4" x 5 1/4"
    • Scraps for heart confetti
  • Whisper White cardstock
    • Card layer (inside) measures 4" x 5 1/4"
    • Card layer (stamped panda) measures slightly less than 3" x 3"
  • It's My Party Designer Series Paper
    • Card layer measures 3 7/8" x 5 1/8"
    • Card layer (inside) measures 4" x 3/8"
  • On Your Birthday and Party Pandas stamp sets
  • Memento Black ink
  • Stampin' Write Markers
    • Crushed Curry
    • Melon Mambo
    • Mint Macaron
  • Circle dies (non SU)
  • Heart Confetti Border and Word Window punches
  • Tear & Tape and Foam Adhesive strips
  • Clear sheet from book report cover (non SU)

Saturday, February 25, 2023

It's My Party Panda Series - Card #25


Stampin' Up! Products
  • Basic Black cardstock
    • Card base measures 4 1/4" x 11"
      • Scored at 5 1/2"
    • Cut section from bottom that measures 4 1/4"x 2"
    • Cut off another section, this measures 4 1/4" x 1"
      • Discard
    • Card layer measures 2 1/4" x 3 1/2"
  • Melon Mambo
    • Top card layer measures 4 1/4"  2 1/4"
    • Bottom card layer measures 4" x 1 3/4"
  • Whisper White cardstock
    • Card layer inside measures 4" x 5 1/4"
    • Card layer measures 2 " x 3 3/4"
  • It's My Party Designer Series Paper
    • Top card layer measures 3 3/4" x 2"
    • Bottom card layer measures 3 3/4" x 1 1/2"
  • Party Pandas stamp set
  • Basic Black ink
  • Basic Black, Crushed Curry, Melon Mambo and Mint Macaron Stampin' Write Markers
  • Clear Wink of Stella
  • Tear & Tape Adhesive
    • Apply adhesive from top - 1 1/2"
    • Apply adhesive from bottom - 1"
  • Dimensionals

Friday, February 24, 2023

It's My Party Panda Series - Card #24

Stampin' Up! Products
  • Whisper White cardstock
    • Card base measures 7 1/2" x 5 1/2"
      • Score at 4 1/4"
    • Scrap for panda* and 2 1/2" circle
  • Crushed Curry cardstock
    • Scrap for back of balloon
  • Melon Mambo cardstock
    • Scrap for 2 5/8" circle
    • Scrap for back of balloon
  • Mint Macaron cardstock
    • Scrap for back of balloon
  • It's My Party Designer Series Paper
    • Card layer measures 3 1/4" x 5 1/2"
    • Card layer measures 1 1/8" x 5 1/2"
    • Scraps for balloons
  • Party Pandas stamp set
  • Basic Black ink
  • Melon Mambo and Regal Rose Stampin' Write Markers
  • Circle dies (non SU)
  • It's My Party Enamel Dots
  • Coordinating baker's twine (non SU)
  • Dimensionals

Thursday, February 23, 2023

It's My Party Panda Series - Card #23

Stampin' Up! Products
  • Crushed Curry cardstock
    • Card layer measures 8 1/2" x 4 1/4"
      • Scored at 4 1/4"
    • Card layer (circle) measures 2 7/8" x 2 7/8"
  • Melon Mambo cardstock
    • Card layer (circle) measures 2 5/8" x 2 5/8"
    • Scrap for sentiment
  • Whisper White cardstock
    • Inside card layer measures 4" x 4"
    • Scrap for pandas
  • It's My Party Designers Series Paper
    • Card layer measures 4" x 4"
  • Party Pandas stamp set
  • Basic Black ink
  • Melon Mambo Stampin' Write Marker
  • Circle dies (non SU)
  • Word Window punch
  • Wink of Stella 
  • Dimensionals
Align circle to card so height doesn't exceed 5 1/2".  Crushed Curry circle goes behind the pattern paper.

Wednesday, February 22, 2023

It's My Party Panda Series - Card #22


Stampin' Up! Products

  • Mint Macaron cardstock
    • Card base measures 5 1/2" x 8 1/2"
      • Scored at 4 1/4"
  • Basic Black cardstock
    • Circle die cut measures 2 7/8" x 2 7/8"
  • Crushed Curry cardstock
    • Scrap for balloon
  • Melon Mambo cardstock
    • Card layer (inside) measures 5/8" x 4"
    • Scrap for balloon and sentiment
  • Whisper White cardstock
    • Scrap for pandas
    • Card layer (inside) measures 5 1/4" x 4"
  • It's My Party Designer Series Paper
    • Circle die cut measures 2 7/8" x 2 7/8"
    • Card layer (inside) measures 1/2" x 4"
  • On Your Birthday and Party Pandas stamp sets
  • Memento Black ink
  • Stampin' Write Markers
    • Crushed Curry
    • Melon Mambo
    • Mint Macaron
  • Woodland Textured embossing folder
  • Circle dies (non SU)
  • Balloon Bouquet and Word Window punches
  • Dimensionals
  • Black and White Baker's Twine (non SU)
  • Wink of Stella Clear

Tuesday, February 21, 2023

It's My Party Panda Series - Card #21


Stampin' Up! Products
  • Melon Mambo cardstock
    • Card base measures 8 1/2" x 5 1/2"
      • Scored at 2 1/8" from both sides
  • Basic White cardstock
    • Card layer (inside) measures 4" x 5 1/4"
    • Scrap for pandas and sentiment
  • Crushed Curry cardstock
    • Card layer (inside) measures 5/8" x 5 1/4"
    • Scrap for sentiment mat
  • Mint Macaron cardstock
    • Card layers measure 1 7/8" x 5 1/4" (cut two)
  • It's My Party Designer Series Paper
    • Card layer measures 3 1/2" x 5 1/8"
      • Cut in half each piece measuring 1 3/4" x 5 1/8"
    • Card layer (inside) measures 1/2" x 5 1/4"
  • Party Pandas stamp set
  • Memento Tuxedo Black ink
  • Stampin' Blends alcohol markers
  • Wink of Stella Clear
  • Modern Label and Word Window punches
  • Rhinestones - on top of hats
    • Tinted with alcohol markers
  • Dimensionals 


Monday, February 20, 2023

It's My Party Panda Series - Card #20


Stampin' Up! Products
  • Crushed Curry cardstock
    • Card layer measures 11" x 5 1/2"
      • Scored at 5 1/2"
        • Refer to tutorial for directions
  • Basic White cardstock
    • Card layer (inside) measures 4" x 5 1/4"
    • Scrap for pandas
  • Melon Mambo cardstock
    • Card layers measure 3 3/8" x 5 1/2"
      • Refer to tutorial for directions
    • Card layer (inside) measures 4" x 3/4"
    • Scrap for balloon
      • Before stamp, apply a layer of Wink of Stella Clear and let dry
  • It's My Party Designer Series Paper
    • Card layers measure 3 3/8" x 5 1/2"
      • Refer to tutorial for directions
    • Card layer measures 4" x 5/8"
  • Balloon Celebration and Party Pandas stamp sets
  • Melon Mambo and Memento Tuxedo Black inks
  • Balloon Bouquet punch
  • Dimensionals
My tutorial diagrams are available FREE with your $25 Stampin' Up! purchase using my current Hostess Code (top right of desk top version). If you are having trouble finding the code, EMAIL me.

The tutorial is also available for purchase HERE. Your $3.95 goes a long way in helping me to continuing purchasing Stampin'  Up! products and make cards to inspire others.


Sunday, February 19, 2023

Favored Flowers Perfectly Aligned Strip Layout - Tutorial Bonus Card #14


This is a bonus card added to my Favored Flowers Designer Series Paper Tutorial. The tutorial was originally twelve thirteen fourteen cards; now it contains twelve thirteen fourteen FIFTEEN card designs. Click HERE for more information. The tutorial is $12.95.


Stampin' Up! Products
  • Very Vanilla cardstock
  • Calypso Coral cardstock
  • Favored Flowers Designer Series Paper
  • Fragrant Flowers stamp set
  • Memento Tuxedo Black ink
  • Stampin' Blends
  • Pearl Basic Jewels
  • Dimensionals

It's My Party Panda Series - Card #19


Stampin' Up! Products
  • Basic Black cardstock
    • Card base measures 8 1/2" x 5 1/2"
      • Scored at 2 1/8" and 4 1/4"
    • Card panels measure 3" x 3 7/8" (cut two)
  • Basic White cardstock
    • Card panels measure 2 7/8" x 3 3/4" (cut two)
  • Crushed Curry cardstock
    • Card layer measures 1 7/8" x 5 1/4"
    • Card layer measures 4" x 5 1/4"
  • It's My Party Designer Series Paper
    • Card layer measures 1 3/4" x 5 1/8"
    • Card layer measures 3 7/8" x 5 1/8"
  • Balloon Celebration, Happiest Birthday Wishes and Party Pandas stamp sets
  • Crushed Curry, Melon Mambo, Mint Macaron and Memento Tuxedo Black inks
  • Stampin' Blends alcohol markers
  • Wink of Stella Clear
    • Coat on unstamped cardstock, let dry then stamp with ink
  • Balloon Bouquet punch 
  • Black embroidery thread
  • It's My Party Enamel dots
  • Dimensionals


Saturday, February 18, 2023

It's My Party Panda Series - Card #18


Stampin' Up! Products
  • Basic Black cardstock
    • Card base measures 8 1/2" x 5 1/2"
      • Scored at 4 1/4"
  • Basic White cardstock
    • Card layer measures 3 7/8" x 5 1/8"
    • Card layer (inside) measures 4" x 5 1/4"
    • Scrap for panda
  • Melon Mambo cardstock
    • Card layer measures 4" x 5 1/4"
    • Card strip measures 5 1/4" x 3/8"
      • Crimp and flatten slightly
    • Card layer (inside) measures 4" x 5/8"
    • Scrap for balloon
  • It's My Party Designer Series Paper
    • Card layer measures 6" x 6"
      • Mark 1" on right side of all corners and cut diagonally
        • Refer to diagram HERE
        • Makes enough for four cards
    • Card layer scrap to fill in space
    • Card layer (inside) measures 4" x 1/2"
  • Balloon Celebration and Party Pandas stamp set
  • Melon Mambo and Memento Tuxedo Black inks
  • Balloon Bouquet punch
  • Wink of Stella
  • Black embroidery thread
  • Dimensionals

Friday, February 17, 2023

Quilted Sympathy - Bookbinding Triangle Fancy Fun Fold Card


This fun fold design tutorial is available for FREE from me when you make a $25 Stampin' Up! purchase using my Hostess Code.  This fun fold layout, called the Bookbinding Triangle Fancy Fold, is NOT available for purchase separately. The layout is included in my Favored Flowers Designer Series Paper Tutorial 
HERE or in other tutorial which can be found HERE.

Stampin' Up! Products
  • Fresh Freesia cardstock
  • Basic White cardstock
  • Blackberry Bliss cardstock
  • Favored Flowers Designer Series Paper
  • Delicate Dahlias and Fragrant Flowers stamp sets
  • Blackberry Bliss and Fresh Freesia inks
  • Quilt Builder Framelets
  • Trio Flower punch
  • Pearl Basic Jewel

It's My Party Panda Series - Card #17


Stampin' Up! Products
  • Basic Black cardstock
    • Card base measures 5 1/2" x 8 1/2"
      • Scored at 4 1/4"
  • Basic White cardstock
    • Card layer (inside) measures 5 1/4" x 4"
    • Scrap for panda and sentiment
  • Crushed Curry cardstock
    • Card layer measures 5 1/4" x 4"
    • Card layer (inside) measures 3/4" x 4"
  • Melon Mambo cardstock
    • Card layer measures 5 1/8" x 3 7/8"
    • Card layer (inside) measures 5/8" x 4"
  • Mint Macaron cardstock
    • Scrap for sentiment mat
  • It's My Party Designer Series Paper
    • Rectangles measure 1 5/8" x 2 5/8" after die cut
    • Card layer (inside) measures 1/2" x 4
  • Party Pandas stamp set
  • Memento Tuxedo Black and Mint Macaron inks
  • Stampin' Blends alcohol markers
  • Wink of Stella clear
  • Stitched So Sweetly dies
  • Modern Label and Word Window punches
  • Black embroidery thread
  • Enamel stars
  • Dimensionals