Showing posts with label Dahlia Days. Show all posts

Sunday, May 7, 2023

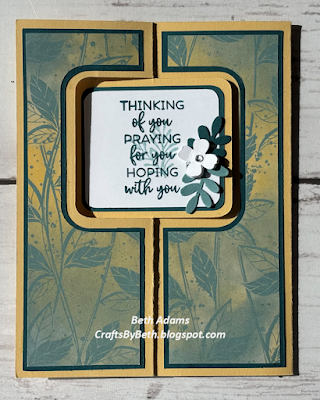
Drapery Pullback Fun Fold 2.0


If you like this card, you will love my Favored Flowers Designer Series Paper Tutorial.  Click
HERE for more information
Stampin' Up! Products
  • Fresh Freesia cardstock
    • Card base measures 8 1/2" x 5 1/2"
      • Score at 4 1/4"
    • Card layer (inside) measures 4" x 5/8"
  • Basic White cardstock
    • Card layer (inside) measures 4" x 5 1/4"
    • Scrap for sentiment
  • Blackberry Bliss cardstock
    • Scrap for sentiment mat
  • Favored Flowers Designer Series Paper
    • Card layer measures 4 1/4" x 5 1/2"
      • Refer to diagram, more information below
    • Card layer (inside) measures 4" x 1/2"
  • Dahlia Days stamp set
  • Rich Razzleberry ink
  • Itty Bitty Accents and Tailored Tag punches
  • Sprig punch (non SU)
  • Pearl Basic Jewels
  • White baker's twine
  • Dimensionals

The diagram with measurements for the card is FREE, please FOLLOW each step.  These steps must be followed completely. Any email request without FIRST posting a comment on this blog post will be discarded.
  1. Follow my blog
  2. Post a comment on my blog. Comment link is at the end of this post.
  3. EMAIL me asking for the Drapery Pullback 2.0If you post a "anonymous" comment on my blog you have to also state in the email that you commented. When you post anonymously I CANNOT tie it back to an email address.
  4. DO NOT POST YOUR EMAIL ADDRESS ON MY BLOG - Spam bots will find it.

Wednesday, April 12, 2023

Use Your Stash Challenge - Card #2

Four Panel Trifold Card

Stampin' Up! Products
  • Old Olive cardstock
    • Card base measures 8 1/2" x 5 1/2"
      • Scored at 1 1/2" and 4 1/4"
    • Scrap for leaves
  • Basic White cardstock
    • Card layer measures 1 7/8" x 5 1/4"
  • Pool Party cardstock
    • Scrap for flowers
  • Whole Lot of Lovely Designer Series Paper
    • Begin with a piece measuring 6" x 5 1/4" (watch for any direction in your paper)
      • First section measures 2 3/4" x 5 1/4"
        • Only apply adhesive onto left panel of card base
      • Second section measures 1 1/8" x 5 1/4"
      • Third Section measures 2" x 5 1/4"
      • Discard sliver
    • Card layer measures 2 1/2" x 5 1/4"
  • Dahlia Days and Framed Florets stamp sets
  • Memento Tuxedo Black ink
  • Framed Florets and Stitched So Sweetly dies
  • Black jewels
  • Dimensionals
The diagram with measurements for the card is FREE, please FOLLOW each step.  These steps must be followed completely. Any email request without FIRST posting a comment on this blog post will be discarded.
  1. Follow my blog
  2. Post a comment on my blog. Comment link is at the end of this post.
  3. EMAIL me asking for the Four Panel Tri FoldIf you post a "anonymous" comment on my blog you have to also state in the email that you commented. When you post anonymously I CANNOT tie it back to an email address.
  4. DO NOT POST YOUR EMAIL ADDRESS ON MY BLOG - Spam bots will find it.


Wednesday, March 15, 2023

Z Front Panel Fun Fold Card


If you like the adorable Ladybug, you WILL LOVE my HELLO LADYBUG FUN FOLD SERIES. In this one tutorial you will make TWENTY different fun folds using the Hello Ladybug stamp set and Ladybug Builder punch. Click HERE for more information.

Stampin' Up! Products
  • Real Red cardstock
    • Card base measures 8 1/2" x 5 1/2"
      • Score at 2 1/8" and 4 1/4"
    • Card layer (inside) measures 5/8" x 5 1/8"
    • Scrap for ladybug and scallop circle
  • Basic Black cardstock
    • Card layers measure 4" x 5 1/4" (cut two)
      • One of these is adhered to the left panel only
        • Refer to diagram available below
    • Scrap for ladybug
  • Basic White cardstock
    • Card layer (inside) measures 3 7/8" x 5 1/8"
    • Scrap for sentiment circle
  • Petal Passion Designer Series Paper
    • Card panel layer measures 3 7/8" x 5 1/8"
      • See tip below
    • Card layer (inside) measures 1/2" x 5 1/8"
  • Dahlia Days and Hello Ladybug stamp sets
  • Memento Tuxedo Black and Real Red inks
  • Layering Circle dies
  • Ladybug Builder punch
  • Rhinestones
  • Dimensionals
The diagram with measurements for the card is FREE, please FOLLOW each step.  These steps must be followed completely. Any email request without FIRST posting a comment on this blog post will be discarded.
  1. Follow my blog
  2. Post a comment on my blog. Comment link is at the end of this post.
  3. EMAIL me asking for the Z Front Panel Fun FoldIf you post a "anonymous" comment on my blog you have to also state in the email that you commented. When you post anonymously I CANNOT tie it back to an email address.
  4. DO NOT POST YOUR EMAIL ADDRESS ON MY BLOG - Spam bots will find it.

TIP
Cut the width of your 12" x 12" to 4" x 12" then cut a piece 5 1/8" x 3 7/8". If you are only making one, the left over piece width will be 4" which is a commonly used width.


Friday, December 16, 2022

Laced Dahlias


Stampin' Up! Products

  • Dapper Denim cardstock
    • Card base measures 4 1/4" x 11"
      • Scored at 5 1/2"
    • Scrap for sentiment mat *
  • Basic White cardstock
    • Card layer measures 4 1/4" x 5 1/2"
      • Die cut this piece
    • Card layer (inside) measures 4" x 5 1/4"
    • Scrap for sentiment
  • Dahlia Days and Flourishing Phrases stamp sets
  • Dapper Denim ink
  • Detailed Dahlias dies
    • Use Sizzix Big Shot Magnetic Platform
      • No longer sold by Stampin' Up!
      • Required four passes through Big Shot
  • Rhinestones
  • Dimensionals
* I used a Brother Scan N Cut to make the shadow of the die

Sunday, November 27, 2022

Note Card Series - Card #23


Stampin' Up! Products
  • Rich Razzleberry cardstock
    • Card layer measures 4 3/4" x 6 3/4'
      • Scored at 3 3/8"
    • Card layer measures 4 1/2" x 3 3/8"
      • Die cut with dies #3 and #5 nested together*
    • Scrap for sentiment mat
  • Basic White cardstock
    • Card layer (inside) measures 4 1/2" x 3 1/8"
    • Scrap for sentiment
  • Fresh Freesia
    • Scrap for die cut and flowers
  • Crafts by Beth CPP Sentiments
    • Click HERE for more information
  • Detailed Dahlias and Stitched Rectangle dies
  • Itty Bitty Accents, Modern Label, and Word Window punches
  • Pearl Basic Jewel
  • Dimensionals
*Dies are numbered with #1 being the largest

Saturday, August 20, 2022

Ladybug Diagonal Joy Fun Fold Card

Measurements and diagram are available. The tutorial is FREE with a $25 or more Stampin' Up! product purchase using my Hostess Code. My Hostess Code can be found at the top right of blog (desktop version).  EMAIL me if you are having trouble finding my current Hostess Code.

Stampin' Up! Products
  • Real Red cardstock
  • Basic Black cardstock
  • Basic White cardstock
  • Sending Love Designer Series Paper
  • Dahlia Days and Hello Ladybug stamp sets
  • Memento Tuxedo Black and Old Olive inks
  • Stitched Rectangle die (smallest)
  • Ladybug Builder punch
  • Rhinestones
  • Dimensionals

Tutorial can also be purchased here

Monday, June 27, 2022

Sending Love - Center Stage Fun Fold


Introducing my newest tutorial - Center Stage Fun Fold! I have created a tutorial with pictures and step by step instructions on how to create this beautiful, one-of-a-kind card. It is available FREE with your $50 or more Stampin' Up! purchase using my current Hostess Code, located at the top of my blog (website version). The tutorial is also available for $8.95, see below.

Stampin' Up! Products
  • Old Olive cardstock
  • Basic White cardstock
  • Calypso Coral cardstock
  • Acetate sheet
  • Petal Garden Designer Series Paper
  • Dahlia Days stamp set
  • Memento Tuxedo Black ink
  • Brilliant Wings and Layering Circle dies
  • Itty Bitty Accents punch
  • Sprig punch (non SU)
  • Gold rhinestones
  • Wink of Stella
  • Dimensionals


Saturday, June 11, 2022

Locking Gatefold Fun Fold Card


Stampin' Up! Products
  • Poppy Parade cardstock
  • Basic White cardstock
  • Evening Evergreen cardstock
  • Pear Pizzazz cardstock
  • Daffodil Afternoon Designer Series Paper
  • Dahlia Days stamp set
  • Memento Tuxedo Black ink
  • Brilliant Wings and Stitched Rectangle dies
  • Pearl Basic Jewels and Rhinestones
Dies are numbered beginning with the largest as #1

Measurements and diagram are available. The tutorial is only available with a $25 or more Stampin' Up! product purchase using my Hostess Code. My Hostess Code can be found at the top right of blog (desktop version).  EMAIL me if you are having trouble finding my current Hostess Code.


Sunday, June 5, 2022

Sending You Lots of Love


If you like this card, you definitely will want my Ever Eden Designer Series Paper tutorial. 
Go to THIS post for more information and. 
Stampin' Up! Products
  • Evening Evergreen cardstock
  • Soft Succulent cardstock
  • Basic White cardstock
  • Ever Eden Designer Series Paper 
  • Memento Tuxedo Black ink
  • Brilliant Wings dies
  • Gold rhinestones