Showing posts with label Helpful Tips. Show all posts

Sunday, August 30, 2026

New Tips and Old Tips Revisited

Over my 20 years of paper crafting, I've learned some tips that have been game changes for me. Some are tips that I started 20 years and still use them. 
  • Die-cutting cutting pads, two pads + a little extra time = NO WARPING!
    • Use one pad as the bottom pad - where the die cuts into the pad
    • Use one pad that NEVER gets die cut into, label it DO NOT CUT
    • Every other pass through your die cut machine, rotate and flip your pads. Don't switch pad positions, just flip and rotate the pads. 
    • EVERY OTHER PASS THROUGH is the key.  Yes it takes time, but so worth the money. Now you have more money to spend on Stampin' Up! Products.  You're welcome!
    • I stopped during this with the Brother Switch embossing machine - it was a nightmare.
  • Cutting your 12" x 12" Designer Series Paper
    • If you need a 3 7/8" layer for one card, cut the DSP at 4" x 12". It is more likely you will use the remaining 4" piece on another project.
    • If  you need a 2 7/8" layer for one, cut the DSP at 3" x 12". It is more likely you will use the remaining 3" piece of another project
  • Storing your Designer Series Paper with scraps
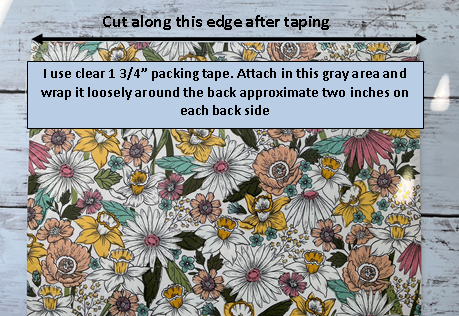
    • Before opening your DSP, loosely apply clear packing tape as indicated here. Wrap it around the back just 2" on each side. This allows you to keep your DSP together along with the scraps in the original package. Keep the thicker white cardstock that your DSP comes in for stability while it is stored. I place scraps smaller than 12" x 6" pieces in the back behind the thicker white cardstock.
    • I also tape my 8 1/2" x 11" cardstock this way
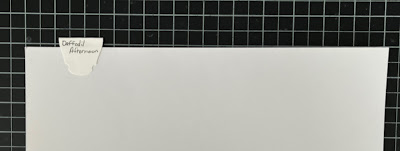
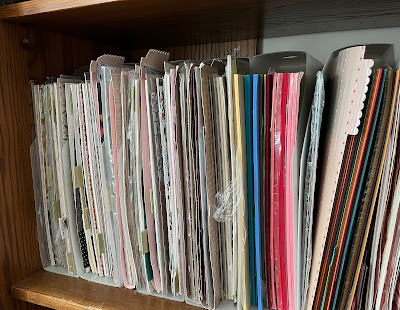
    • Create a file type label with any punch you have.  Attach it to a 12" x 12" piece of heavy cardstock. My DSP is filed alphabetically in an armoire. 

  • Color Combinations
    • Check the back of a package of SU DSP, the colors that coordinate well are listed there. You don't have to use the DSP to know what colors coordinate.
    • Color Coordinating for Dummies - my favorite website, Create, Ink, Color Lab
  • Know What You Have
    • Create a digital document with digital pictures of your stamps and dies
    • Add in descriptions
    • Use the "search" feature in that document
    • Stamp inventory check out my pdf and Word Document I use HERE
  • Ribbon Embellishments - Do you struggle like I do making your ribbon embellishment behind a sentiment?
    • I use Press'n Seal to create ribbon and flower layout designs.  Simply create your ribbon zigzag, with the sticky side down of the Press'n Seal, apply that to your ribbon.  Apply adhesive to where you want to place the embellishment and press your work onto your card.  Gently pull back the Press'n Seal and presto - truly a work of art.
  • Getting it Straight
    • Place a Silicone Craft Sheet on top of the  layer to prevent adhesive such like Dimensionals from being placed crooked on your card.  Move the craft sheet as you slowly attach the card layer
  • Keep it steady and straight
    • Check out my blog post HERE.
    • If you have seen my GLASS MAT 2.0. The magnetic knobs holds these in place PERFECTLY


  • Lint rollers are not just for clothes
      • What are all those SU Dimensionals doing all over my desk? I have a lint roller on my desk to pick up along with the little scraps of paper. THIS brand is what I use. 
  • Another pair of hands
    • I use temporary glue runner to hold my pieces together while designing a card. It comes off easily. You can purchase a package of four HERE. At one point they offered a single, for the price of two I would pay more than the four pack.

These are my Amazon Affiliate links, they don't cost you anymore but I receive a small commission. In case you are wondering, I haven't had a customer purchase anything on Stampin' Up! for a decade. I pay for card idea I post. Please consider using my Amazon Affiliate; I would be grateful.


This Tip Deserves an Entire Post


Is your card layer always moving around when you are trying to add another card layer? All you need is graph paper, laminating pouch, and repositionable mounting squares. I drew a rectangle that represents an A2 (5 1/2" x 4 1/4") card layer on both sides and then laminated. it There is 1/8" graph paper available, I have that as well.

After laminating, I place mounting square on top to hold the cardstock down. You can also apply a mounting square to the back to hold it onto your work surface. Laminating machines are not terribly expensive: Amazon and Scotch brand. I have owned my Scotch brand laminator (not this one) and it has never disappointed me. I purchased it in 2010.

This can last for years. For easy cleanup use alcohol wipes.

I have seen so many YouTube videos showing how to think "out of the box" and use a laminator machine for your crafting. 

These are my Amazon Affiliate links, they don't cost you anymore but I receive a small commission. In case you are wondering, I haven't had a customer purchase anything on Stampin' Up! for a decade. I pay for card idea I post. Please consider using my Amazon Affiliate; I would be grateful


Friday, September 27, 2024

Helpful Tip


Is your card layer always moving around when you are trying to add another card layer? All you need is graph paper, laminating pouch, and repositionable mounting squares. I drew a rectangle that represents an A2 (5 1/2" x 4 1/4") card layer on both sides and then laminated. it There is 1/8" graph paper available, I have that as well.

After laminating, I place mounting square on top to hold the cardstock down. You can also apply a mounting square to the back to hold it onto your work surface. Laminating machines are not terribly expensive: Amazon and Scotch brand. I have owned my Scotch brand laminator (not this one) and it has never disappointed me. I purchased it in 2010.

This can last for years. For easy cleanup use alcohol wipes.

I have seen so many YouTube videos showing how to think "out of the box" and use a laminator machine for your crafting. 

Please consider using my Amazon Affiliate links for your purchases. It is a way for you to support my work. Thank you. 

Saturday, March 4, 2023

Helpful Tips

Let's take a walk back memory lane and revisit my post on February 14, 2022 which my new subscribers may have missed.  These tips still hold true today! I have found the following the best tips I can pass on as a card maker.
  • Die-cutting cutting pads, two pads + a little extra time = NO WARPING!
    • Use one pad as the bottom pad - where the die cuts into the pad
    • Use one pad that NEVER gets die cut into, label it DO NOT CUT
    • Every other pass through your die cut machine, rotate and flip your pads. Don't switch pad positions, just flip and rotate the pads. 
    • EVERY OTHER PASS THROUGH is the key.  Yes it takes time, but so worth the money. Now you have more money to spend on Stampin' Up! Products.  You're welcome!
  • Cutting your 12" x 12" Designer Series Paper
    • If you need a 3 7/8" layer for one card, cut the DSP at 4" x 12". It is more likely you will use the remaining 4" piece on another project.
    • If  you need a 2 7/8" layer for one, cut the DSP at 3" x 12". It is more likely you will use the remaining 3" piece of another project
  • Storing your Designer Series Paper with scraps
    • Before opening your DSP, loosely apply clear packing tape as indicated here. Wrap it around the back just 2" on each side. This allows you to keep your DSP together along with the scraps in the original package. Keep the thicker white cardstock that your DSP comes in for stability while it is stored. I place scraps smaller than 12" x 6" pieces in the back behind the thicker white cardstock.
    • I also tape my 8 1/2" x 11" cardstock this way
    • Create a file type label with any punch you have.  Attach it to a 12" x 12" piece of heavy cardstock. My DSP is filed alphabetically in an armoire. 


  • Color Combinations
    • Check the back of a package of SU DSP, the colors that coordinate well are listed there. You don't have to use the DSP to know what colors coordinate.
    • Color Coordinating for Dummies - my favorite website, Create, Ink, Color Lab
  • Know What You Have
    • Create a digital document with digital pictures of your stamps and dies
    • Add in descriptions
    • Use the "search" feature in that document
    • Check out one page of my stamp inventory HERE
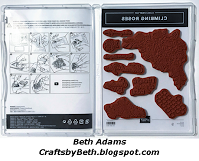
  • Stampin' Up! now includes a reverse image of the stamp set on the inside of their cases. Make all your older stamp cases look the same!
    • I use to save the left over rubber in the case so it was easy to make sure I had returned all the stamps to the case.  Doesn't work for the new stamps. I needed an easy way to insure that I placed all the stamps back.  I scanned the front of the Stampin' Up! image sheet and flipped the picture so I could insert it into the back of the case.  Added my stamps, and WOW I'm a genius! Some computer skills are necessary. The step by step picture tutorial can be downloaded HERE.
  • Cling Mount Stamp Labels - Don't throw away the scraps.
    • The new Stampin' Up! cling mount stamps now STAY on your acrylic blocks.  Why not make your older Clear Mount stamps STAY by using the scraps?! 
  • Try Before You Buy Make
    • Use some of your long forgotten DSP that you really don't like but can't part with, use it to create samples. 
    • When I challenge myself to make fun fold cards, I also use scrap cardstock and pattern paper.  I design the layout and cut my cardstock.  If I like a style, I write down the card measurements and keep them together for future use.  Look at the messy way I keep this tip.

  • Ribbon Embellishments - Do you struggle like I do making your ribbon embellishment behind a sentiment?
    • I use Press'n Seal to create ribbon and flower layout designs.  Simply create your ribbon zigzag, with the sticky side down of the Press'n Seal, apply that to your ribbon.  Apply adhesive to where you want to place the embellishment and press your work onto your card.  Gently pull back the Press'n Seal and presto - truly a work of art.
 

  • Getting it Straight
    • Place a Silicone Craft Sheet on top of the  layer to prevent adhesive such like Dimensionals from being placed crooked on your card.  Move the craft sheet as you slowly attach the card layer