Showing posts with label Free instructions. Show all posts

Friday, December 1, 2023

Using Up Your Retired Cardstock AND Crafts by Beth Circle Sentiments for Dies and Punches - Part III


Stampin' Up! Products
  • Fresh Fig cardstock
    • Card base measures 8 1/2" x 5 1/2"
      • Score at 4 1/4"
      • Fold and trim card base to 5 1/2" x 4 1/8"
    • Scrap for sentiment mat and flowers
  • Basic White cardstock
    • Card layer measures 4 1/4" x 5 1/2"
      • Die cut using flowered die
    • Card layer measures 4 1/4" x 5 1/2"
      • Nest together the two largest rectangle dies
      • Outer layer finished size measures 3 7/8" x 5 1/4"
      • Inner layer finished measures 2 5/8" x 4"
        • Save for another project
    • Card layer (inside) measures 3 7/8" x 5 1/4"
      • OR
        • Card layer (inside) measures 4 1/4" x 5 1/2"
          • Die cut using frame
    • Scrap for sentiment
  • Pear Pizzazz cardstock
    • Scrap for sprig
    • Hmmmm what color goes well with Fresh Fig?
      • Check out this website HERE
        • Use the pull down to "Choose Selection" and Select "All Colors"
          • Refer to picture below
  • Stamp set - Crafts by Beth Circle Sentiments for Dies and Punches
    • Click HERE for more information
  • Gorgeous Garden and Radiating Stitched dies
  • Circle die (non SU) 
  • Itty Bitty Accents punch
  • Sprig punch (non SU)
  • Pearl Basic Jewel
  • Dimensionals


Monday, November 27, 2023

Using Up Your Retired Cardstock AND Crafts by Beth Circle Sentiments for Dies and Punches - Part I


I found this card layout on Pinterest (by Mary Fish) and felt it would be an easy way to use up my retired Stampin' Up! cardstock. I changed it up a bit and have provided the details below

Stampin' Up! Products
  • Very Vanilla cardstock
    • Card base measures 8 1/2" x 5 1/2"
      • Score at 4 1/4"
      • Fold and trim card base to 5 1/2" x 4 1/8"
    • Scrap for sentiment
  • Cajun Craze cardstock
    • Card layer measures 4 1/4" x 5 1/2"
      • Nest together the two largest rectangle dies
      • Outer layer finished size measures 3 7/8" x 5 1/4"
      • Inner layer finished measures 2 5/8" x 4"
        • Layered with Evening Evergreen
  • Evening Evergreen cardstock
    • Card layer measures 2 7/8" x 4 1/4"
    • Scrap for leaves
      • Die cut with leaves
  • Stamp set - Crafts by Beth Circle Sentiments for Dies and Punches
    • See below for more information
  • Radiating Stitched dies
  • Crochet Thread (non SU)
  • Gold rhinestones
  • Dimensionals


Crafts by Beth New Circle Sentiments for Dies and Punches


  • Sentiments without stamps
  • Designed to be used with dies 1 1/2" wide and 1 3/8" circle punch
  • The PDF has fourteen pages designed to make life easier
  • A sheet with four of each of the following sentiments: Deepest Sympathy, Praying for You, Get Well Soon, Thinking of You, Happy Birthday and Thank You
    • One sheet has a circle around each sentiment for making punching and die cutting easier
    • One sheet does not have a circle around the sentiments
  • A full sheet for each of the following sentiments: Deepest Sympathy, Praying for You, Get Well Soon, Thinking of You, Happy Birthday and Thank You. A total of twenty-four sentiments per sheet
    • One sheet has a circle around each sentiment for making punching and die cutting easier
    • One sheet does not have a circle around the sentiments
  • Designed to help you center your die or punch
  • Print Black and White on any high-quality cardstock such as Stampin' Up!'s Basic White, Very Vanilla and all their colored cardstock.

Wednesday, November 8, 2023

DSP Display Card


I created this card using the instructions and video by Rachel at Stamp Your Art Out - Click HERE.  Please, please, please no one comments here; but please at least leave a comment on Rachel's video and give her a thumbs up. All bloggers spend a great amount of time (including me) to share what they love.

Rather than duplicate the information, I have listed the materials I used.

Stampin' Up! Products
  • Early Espresso cardstock - see below
    • Card base measures 6 1/4" x 5 1/2"
      • Score at 1" and 5 1/4"*
  • Very Vanilla cardstock
  • Dandelion Wishes and Layering Leaves stamp sets
  • Early Espresso ink
  • Banner Triple punch
  • Adhesive-Backed Dragonflies & Birds
I made a slight adjustment to Rachel's scoring of the card base. Instead of scoring the card base at 1" from both ends, I scored it at 1" and 5 1/4". This insures the folded card will be closer to the closed card base of 4 1/4"


Wednesday, July 19, 2023

The Best Tip Ever for Your Die Cutting Machine Plates

Do you die cutting machine plates bow? Do you have to toss them out with just six months of use. This is the ULTIMATE tip for prevent bowing of die cutting machine plates!

This is one year use of two cutting plates for my Big Shot. I designated one plate to be the cut-in-die and  the other plate free of cuts. These two plates will last another year, at the very least.

How did I do it? Every other pass through my Big Shot, I flipped AND turned over each plate. Be persistent and your cutting plates WILL look like these.


Friday, April 21, 2023

Three Diamonds Fun Fold Tutorial - Favored Flowers

I saw so many posts on Pinterest for this card, so....I had to create a tutorial and diagram.  

Stampin' Up! Products
  • Fresh Freesia cardstock
  • Basic White cardstock
  • Rich Razzleberry cardstock
  • Favored Flowers Designer Series Paper
  • Brilliant Wings dies
  • Pearl Basic Jewels
  • Wink of Stella Clear

The diagram with measurements for the card is FREE, please FOLLOW each step.  These steps must be followed completely. Any email request without FIRST posting a comment on this blog post will be discarded.
  1. Follow my blog
  2. Post a comment on my blog. Comment link is at the end of this post.
  3. EMAIL me asking for the Three Diamonds Fun FoldIf you post a "anonymous" comment on my blog you have to also state in the email that you commented. When you post anonymously I CANNOT tie it back to an email address.
  4. DO NOT POST YOUR EMAIL ADDRESS ON MY BLOG - Spam bots will find it.

Thursday, March 9, 2023

Favored Flowers Thank You

If you like the Favored Flowers Designer Series Paper, you will love my tutorial featuring instructions and measurements for FIFTEEN cards, click HERE for more information

Stampin' Up! Products
  • Blackberry Bliss cardstock
    • Card base measures 5 1/2" x 8 1/2"
      • Score at 4 1/4"
    • Card layer measures 3 1/8" x 4 3/8"
    • Finished banner measures 2 3/8" x 5/8"
  • Fresh Freesia cardstock
    • Card layer measures 5 1/4" x 4"
      • Use Stitched Greenery die
    • Card layer (inside) measures 5/8" x 5 1/4"
    • Scrap for flowers
  • Mossy Meadow cardstock
  • Very Vanilla cardstock
    • Card layer (inside) measures 4" x 5 1/4"
    • Finished banner measures 2 1/2" x 1/2"
  • Favored Flowers Designer Series Paper
    • Card layer measures 3" x 4 1/4"
    • Card layer (inside) measures 1/2" x 5 1/4"
  • Everything is Rosy stamp set
  • Flower stamp set (non SU)
  • Blackberry Bliss and Mossy Meadow inks
  • Stitched Greenery die
  • Flower and leaf dies (non SU)
  • Happy Labels Pick A Punch
  • Pearl Basic Jewels
  • Dimensionals

Saturday, March 4, 2023

Weekly Blog Posts

BLOG POST NEWS

Starting today, you will receive only one email per week, on Saturday. Does that mean I am only posting once a week? NO WAY! I will post throughout the week and you will receive ONE email which will contain every post for that week. Don't forget to open that email to see each and every post for that week.  

Why once a week? My email subscription service now limits me to 1,000 total free emails per month. If I have 500 subscribers, I can only post twice a month. 

DON'T FORGET TO SCROLL DOWN!

* * * * * * * *

Let's take a walk back memory lane and revisit my post on February 14, 2022 which my new subscribers may have missed.  These tips still hold true today!

I have found the following the best tips I can pass on as a card maker.
  • Die-cutting cutting pads, two pads + a little extra time = NO WARPING!
    • Use one pad as the bottom pad - where the die cuts into the pad
    • Use one pad that NEVER gets die cut into, label it DO NOT CUT
    • Every other pass through your die cut machine, rotate and flip your pads. Don't switch pad positions, just flip and rotate the pads. 
    • EVERY OTHER PASS THROUGH is the key.  Yes it takes time, but so worth the money. Now you have more money to spend on Stampin' Up! Products.  You're welcome!
  • Cutting your 12" x 12" Designer Series Paper
    • If you need a 3 7/8" layer for one card, cut the DSP at 4" x 12". It is more likely you will use the remaining 4" piece on another project.
    • If  you need a 2 7/8" layer for one, cut the DSP at 3" x 12". It is more likely you will use the remaining 3" piece of another project
  • Storing your Designer Series Paper with scraps
    • Before opening your DSP, loosely apply clear packing tape as indicated here. Wrap it around the back just 2" on each side. This allows you to keep your DSP together along with the scraps in the original package. Keep the thicker white cardstock that your DSP comes in for stability while it is stored. I place scraps smaller than 12" x 6" pieces in the back behind the thicker white cardstock.
    • I also tape my 8 1/2" x 11" cardstock this way
    • Create a file type label with any punch you have.  Attach it to a 12" x 12" piece of heavy cardstock. My DSP is filed alphabetically in an armoire. 


  • Color Combinations
    • Check the back of a package of SU DSP, the colors that coordinate well are listed there. You don't have to use the DSP to know what colors coordinate.
    • Color Coordinating for Dummies - my favorite website, Create, Ink, Color Lab
  • Know What You Have
    • Create a digital document with digital pictures of your stamps and dies
    • Add in descriptions
    • Use the "search" feature in that document
    • Check out one page of my stamp inventory HERE
  • Stampin' Up! now includes a reverse image of the stamp set on the inside of their cases. Make all your older stamp cases look the same!
    • I use to save the left over rubber in the case so it was easy to make sure I had returned all the stamps to the case.  Doesn't work for the new stamps. I needed an easy way to insure that I placed all the stamps back.  I scanned the front of the Stampin' Up! image sheet and flipped the picture so I could insert it into the back of the case.  Added my stamps, and WOW I'm a genius! Some computer skills are necessary. The step by step picture tutorial can be downloaded HERE.
  • Cling Mount Stamp Labels - Don't throw away the scraps.
    • The new Stampin' Up! cling mount stamps now STAY on your acrylic blocks.  Why not make your older Clear Mount stamps STAY by using the scraps?! 
  • Try Before You Buy Make
    • Use some of your long forgotten DSP that you really don't like but can't part with, use it to create samples. 
    • When I challenge myself to make fun fold cards, I also use scrap cardstock and pattern paper.  I design the layout and cut my cardstock.  If I like a style, I write down the card measurements and keep them together for future use.  Look at the messy way I keep this tip.

  • Ribbon Embellishments - Do you struggle like I do making your ribbon embellishment behind a sentiment?
    • I use Press'n Seal to create ribbon and flower layout designs.  Simply create your ribbon zigzag, with the sticky side down of the Press'n Seal, apply that to your ribbon.  Apply adhesive to where you want to place the embellishment and press your work onto your card.  Gently pull back the Press'n Seal and presto - truly a work of art.
 

  • Getting it Straight
    • Place a Silicone Craft Sheet on top of the  layer to prevent adhesive such like Dimensionals from being placed crooked on your card.  Move the craft sheet as you slowly attach the card layer


Thursday, November 17, 2022

Note Card Series - Card #20


Stampin' Up! Products
  • Basic White Thick cardstock
    • Card base measures 4 7/8" x 6 3/4"
      • Scored at 3 3/8"
    • Finished banner measures 2 7/8" x 1/2"
  • Basic Black cardstock
    • Scrap for ladybug
  • Lovely Lipstick cardstock
    • Scrap for ladybug
  • All My Love Designer Series Paper
  • Express Yourself and Hello Ladybug stamp sets
  • Memento Tuxedo Black ink
  • Banner Pick a Punch and Ladybug Builder punches
  • Rhinestones
If you want more Hello Ladybug ideas, click HERE.

Sunday, December 1, 2019

Sending Love - Modified Tuck Fold Card


This is a modified tuck fold card.  I added an additional layer of cardstock

Stampin' Up! Products
  • Crumb Cake cardstock
    • Card layer measures 11" x 4 1/4"
      • Cut off one section measuring 3" x 4 1/4" (this is your center panel)
      • Score remaining piece at 5 1/2"
  • Lovely Lipstick cardstock
    • Card layer (inside) measures 5 1/4" x 4"
    • Card layer (center) measures 4" x 2 3/4"
      • Cut your scallop circle die from this
    • Card layer (left side) measures 2 3/4" x 4"
    • Card layer measures 2" x 2"
      • Cut diagonally
  • Whisper White cardstock
    • Card layer (inside) measures 5 1/8" x 3 7/8"
    • Scrap for circle die cut and bird
  • All My Love Designer Series Paper
    • Card layer (center) measures 3 7/8" x 2 5/8"
    • Card layer (left side) measures 2 1/8" x 3 7/8"
    • Card layer measures 1 3/4" x 1 3/4"
      • Cut diagonally
  • Climbing Roses and Free As a Bird stamp sets
  • Inks
    • Crumb Cake
    • Lovely Lipstick
    • Memento black ink
  • Stampin' Blends
    • Cherry Cobbler
    • Crumb Cake
    • Old Olive
  • Layering Circles Framelits
  • Dimensionals

Check out Lynn Dunn's video HERE,  Please be sure to leave her a comment - she is a great instructor and fellow demonstrator.

Wednesday, November 20, 2019

Magnolia Tuck Card

Stampin' Up! Products
  • Mossy Meadow cardstock
    • Card layer measures 11" x 4 1/4"
      • Cut off one section measuring 3" x 4 1/4"
      • Score remaining piece at 5 1/2"
  • Whisper White cardstock
    • Card layer measures 4" x 2 3/4"
    • Card layer (inside) measures 5 1/4" x 4"
  • Magnolia Lane Designer Series Paper
    • Card layer (left panel) measures 2 1/4" x 4"
    • Card layer (corner) measures 2" x 2"
      • Cut diagonally
  • Good Morning Magnolia stamp set
  • Black Memento ink
  • Stampin' Blends
    • Mossy Meadow
    • Petal Pink
    • So Saffron
  • Pearl Basic Jewels (dyed to match)
  • Dimensionals

Check out Lynn Dunn's video HERE,  Please be sure to leave her a comment - she is a great instructor and fellow demonstrator.

Friday, June 28, 2019

Floral Hello

Stampin' Up! Products
  • Rich Razzleberry cardstock
    • Card base measures 8 1/2" x 5 1/2"
      • Scored at 4 1/4"
    • Card layer measures 4 7/8" x 3 1/2"
      • Use #2 die
    • Card layer (inside) measures 5/8" x 4"
  • Old Olive cardstock
    • Banner measures 1/2" x 1"
  • Whisper White cardstock
    • Card layer measures 4 1/2" x 3 3/4"
      • Use #3 die
    • Card layer (inside) measures 5 1/4" x 4"
  • Rich Razzleberry Patterns Designer Series Paper
    • Card layer measures 4" x 5 1/4"
    • Card layer (inside) measures 1 1/2" x 4"
  • Floral Statements stamp set
  • Memento Black ink
  • Stampin' Blends
    • Daffodil Delight
    • Mossy Meadow
    • Rich Razzleberry
  • Stitched Rectangle Framelits
  • Pearl Basic Jewels

Saturday, June 22, 2019

Masculine Thinking of You

Stampin' Up! Products
  • Whisper White cardstock
    • Card base measures 8" x 5 1/2"
      • Scored at 4"
    • Card layer (inside) measures 3 3/4"x 5 1/4"
  • Delightful Dijon cardstock
    • Scrap for bird
  • Garden Green cardstock
    • Card layer measures 4" x 4 3/4"
    • Card layer (inside) measures 1/2" x 5 1/4
    • Scrap for branch
  • Warm & Cheer Designer Series Paper
    • Begin with 6" x 6"
      • See below
    • Card layer (inside) measures 1/2" x 5 1/4"
  • Language of Friendship and Sincere Salutations
  • Memento black ink
  • Bird Builder punch
  • Dimensionals
I cut my pattern paper at 4" to get more cuts out of a sheet; whether it is 6" x 6" or 12" x 12"


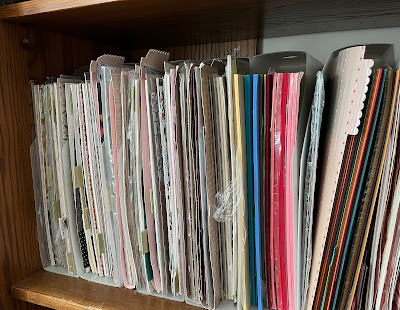
Getting The Most of Your Treasured Designer Series Paper
This is from a previous post

I hate when my 6" x 6" paper only nets one card layer, don't you?  I found this layout that I wanted to try.  Instead of destroying my paper and only getting one card I decided to use a scrap piece of paper and making a template.

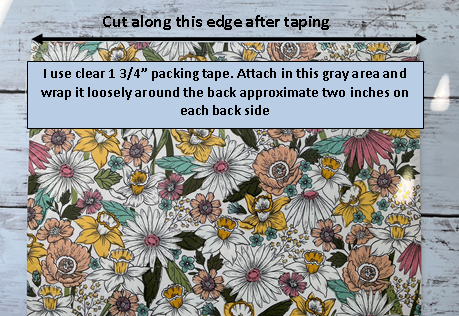
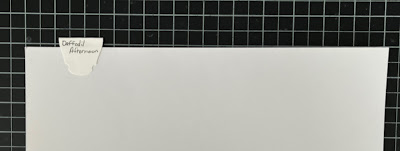
My template was the same size of the card (4" x 5 1/2").  I laid the paper down at the angle I wanted and traced the outline.

I can't cut a straight line, so I cut the template this way for a more accuracy.  Using the template I created another one.  You may have to play with the position of the template on your card base.  The second time I created a template, I was able to get two pieces out of my 6" x 6" paper.  Happy Dance!


I can't cut a straight line straight, I placed my template into my trimmer to get a more accurate cut.


Line up the two templates on your paper and trace.


Attach to your cardstock and using your trimmer create a 1/8" mat. The top and sides are not trimmed to expose the cardstock.


Monday, June 10, 2019

Whole Lot of Lovely


Stampin' Up! Products
  • Pool Party cardstock
    • Card base measures 8 1/2" x 5 1/2"
      • Scored at 4 1/4"
    • Stitched Rectangle Framelits #2, #9 and #11
    • Scrap for flowers
  • Old Olive cardstock
    • Card layer (inside) measures 3/8" x 5 1/4"
    • Scrap for leaves
  • Whisper White cardstock
    • Card layer (inside) measures 3 3/4" x 5 1/4"
    • Scrap for sentiment, Stitched Rectangle Framelits #12
  • Whole Lot of Lovely Designer Series Paper
    • Card layer measures 4" x 5 1/4" (* see below)
      • Stitched Rectangle Framelits #3 and #10
    • Card layer (inside) measures 1/4" x 5 1/4"
  • Flower (non SU) and Lasting Lily stamp sets
  • Memento black and Old Olive inks 
  • Stitched Rectangle Framelits
  • Dimensionals
  • Black jewels
*Note:  You could use the #1 die to cut out your first layer which is 4" x  5 1/4".  The die isn't a perfect 4" x 5 1/4"; if you use the #1 die you will have to trim your card base as well as the inside layer.

Would like to know which size rectangle die I used on this post and future ones? They are FREE with a purchase of the Stitched Rectangle Framelits using my Hostess Code (top right hand corner of blog). Anytime I post a project using these dies, you will receive a PDF with the measurements and each respective rectangle die used. Along with your die purchase, you will receive my storage and layout pictorial.

EMAIL me for more information.  This offer expires on March 31, 2019.

Wednesday, April 3, 2019

Time to say goodbye......

I am leaving my cherished United Methodist Women sisters next month.  My husband and I purchased a home near our son, daughter-in-law and granddaughters.  It's time to me to be a full-time grandma.

I leave behind many friends and as a thank you for their friendship, I created a bookmark for all of them.

Stampin' Up! Products
  • Whisper White 
    • Bookmark measures 2" x 4 1/4"
    • Scrap for sentiment
  • Calypso Coral cardstock
    • Bookmark backing measures 2" x 4 1/4"
    • Scrap for sentiment mat
  • Botanical Butterfly Designer Series Paper
    • Punch out one small butterfly
  • Beauty Abounds and Ribbon of Courage stamp sets
  • Memento black ink
  • Stampin' Blends
    • Calypso Coral - dark and light
    • Old Olive - dark and lit
  • Organdy ribbon
  • Butterfly Duet, Corner Rounder and Scallop Tag Topper punches
  • Layering Oval Framelits
  • Dimensionals
Balmy Blue, Daffodil Delight and Highland Heather


Monday, January 28, 2019

Rectangle Stitched Framelits

Stampin' Up! Products
  • Very Vanilla cardstock
    • Card base measures 4" x 5 1/2"
    • Card layer (DSP backing) measures 2 5/8" x 4 5/8"
    • Card layer (inside) measures 3 3/4" x 5 1/4"
    • Banner measures 3" x 1/2"
  • Blushing Bride cardstock
    • Scrap for butterfly
  • Sweet Sugarplum cardstock
    • Card layer measures 2 3/4" x 4 3/4"
    • Card layer measures 3 1/2" x 1 1/2"
    • Card layer (inside) measures 3/4" x 5 1/4"
    • Scrap for butterfly
  • Playful Palette Designer Series Paper
    • Card layers - cut five using #10 sized die
      • Attach two pieces side by side 
      • Cut 1 1/4" off two pieces
        • Attach side by side *
      • Remaining piece is the horizontal piece
    • Card layer (inside) measures 1/2" x 5 1/4"
  • Butterfly Gala stamp set
  • Memento black ink
  • Rectangle Stitched Framelits
  • Butterfly die (non SU)
  • Dimensionals
  • Pearl Basic Jewels
* Hide the side that doesn't have the stitched line this way.


Thursday, January 17, 2019

Teapot Birthday Wish

Stampin' Up! Products
  • Flirty Flamingo cardstock
    • Card base measures 8 1/2" x 5 1/2"
      • Scored at 4 1/4"
    • Card layer measures 4" x 5 1/4"
    • Card layer (inside) measures 1/2" x 5 1/4"
  • Calypso Coral
    • Scrap for sentiment layer
  • Whisper White cardstock
    • Card layer (inside) measures 4" x 5 1/4"
    • Scrap for sentiment and flowers (1 large 2 small)
  • Floral paper
    • Card layer (inside) measures 3/8" x 5 1/4"
    • Scrap for teapot 
  • Humming Along and Tea Together stamps sets
  • Memento black ink
  • Stampin' Write Blends
    • Calypso Coral
    • Flirty Flamingo
    • Old Olive
  • Hummingbird and Tea Time Framelits
  • Circle 1" punch
    • Used for laying sentiment
  • Tufted Dynamic Textured Impressions Folder
  • Dimensionals
  • Pearl Basic Jewels 

Saturday, January 12, 2019

Cling Stamp Storage Idea

I love the new Cling Stamps by Stampin' Up!.  Your stamps will now stay on your clear blocks.

I used to save the left over rubber in the case so it was easy to make sure I had returned all the stamps to the case.  Doesn't work for the new stamps. I needed an easy way to insure that I placed all the stamps back.  I scanned the front of the Stampin' Up! image sheet and flipped the picture so I could insert it into the back of the case.  Added my stamps, and WOW I'm a genius!


Some computer skills are necessary.  The step by step picture tutorial can be downloaded HERE.

Thursday, January 10, 2019

Valentine's Day Duo Gift Set

Cute inexpensive Valentine gifts for a friend or co-worker.

Altered Mini-Composition Book

Stampin' Up! Products
  • Rich Razzleberry cardstock *
    • Back to front wrap measures 4 5/8" x 4 5/8"
      • Scored at 2 3/4" and 3 1/8"
    • Front cover measures 2 3/4" x 4 5/8"
    • Scrap for scallop circle
  • Calypso Coral cardstock
    • Scrap for flower
  • Melon Mambo cardstock
    • Front left layer measures 2 1/2" x 4 1/4"
    • Right flap measures 1 1/4" x 4 1/4"
    • Scrap for 1 3/8" circle punch
  • Whisper White cardstock
    • Scrap for sentiment
  • Painted with Love Designer Series Paper
    • Front left panel measures 2 1/4" x 4"
    • Right wrap around measures 1" x 4"
    • Tip: If the back of your paper has a foil print, lightly buff using a nail file. This will insure your glue holds up.
  • Crafts by Beth CPP Sentiment
    • Prayer Journal - click HERE for more information
  • Scallop circle die (non SU)
  • Circles 1 3/8" and 1 1/4", Itty Bitty Accent and Corner Rounder punches
  • Mini Composition books
    • Walmart pack of 3 for $.88
  • Tear & Tape Adhesive
  • Pearl Basic Jewel
    • Dyed using Rich Razzleberry Stampin'  Blends 
  • Glue Dots (for magnets)
  • Magnets
    • Deal Extreme LINK
      • 8 mm x 1 mm

Matchbox Treat Holder


Stampin' Up! Products
  • Rich Razzleberry cardstock
    • Box bottom layer measures 5 1/2" x 6 1/2"
      • Check out THIS video on how to use your 12" x 12" 
    • Box sleeve measures 3 1/2" x  6 1/2"
  • Calypso Coral cardstock
    • Scrap for flower
  • Melon Mambo cardstock
    • Box sleeve layer measures 1 3/4" x 2 3/8"
  • Whisper White cardstock
    • Scrap for sentiment
  • Painted with Love Designer Series Paper
    • Box sleeve layer measures 1 5/8" x 2 1/4"
  • Razzleberry Lemonade Designer Series Paper
    • Strips for chocolate measure 1 1/8" x 3"
  • Crafts by Beth CPP Sentiment
    • Prayer Journal - click HERE for more information
  • Matchbox Bigz XL Die
  • Scallop circle die (non SU)
  • Circles 1 3/8" and 1 1/4", Itty Bitty Accent and Corner Rounder punches
  • Dimensionals
  • Pearl Basic Jewel
    • Dyed using Rich Razzleberry Stampin'  Blends 
  • Hershey Nuggets
* All mini-composition books are not identical in size.  Sometimes the length is 1/16" off and the front and back panels are slightly off.  I start with the Cherry Cobbler cardstock size and after I glue it to the book, I trim using an X-ACTO knife. If the sizes vary greatly, small adjustments are needed for the black and patterned paper.


Sunday, November 25, 2018

Plaid Christmas Bookmark


Stampin' Up! Products (below is for the left bookmark)
  • Cherry Cobbler cardstock
    • Bookmark back 2" x 4 1/4"
    • Scrap for flower
  • Basic Black cardstock
    • Scraps for oval die cut and flower centers
  • Garden Green cardstock
    • Scrap for sprig
  • Warmth & Cheer Designer Series Paper
    • Bookmark front 2" x 4 1/4"
      • Attach to solid cardstock
      • Punch tag and round corners
  • So Glad We Are Friends (non SU)
  • Basic Black ink
  • Bloomin' Hearts Framelits
  • Stitched Oval dies (non SU)
  • Banner Triple and Corner Rounder punches
  • Sprig punch (non SU)
  • Crop-A-Dile (for black centers)
  • Glue dots
I offset the sentiment for for a different look.

The tassel is homemade, I used DMC 5 100% Cotton embroidery thread. DMC's cross stitch thread is too thin. Stampin' Up!'s baker's twine would definitely work as well as crochet thread. I lost my original instructions on how to make tassels.  I used this VIDEO but modified it; practice, practice, practice.