Showing posts sorted by relevance for query using card. Sort by date Show all posts

Thursday, October 15, 2020

Praying for You - Using Card Maps


If you have followed my last three blog posts, I provided tips and pictures of how I tackle using card maps. 

Stampin' Up! Products
  • Very Vanilla cardstock
    • Card base measures 8 1/2" x 5 1/2"
      • Scored at 4 1/4"
    • Card layer measures 4" x 1 1/8"
    • Card layer (inside) measures 4" x 5 1/4"
  • Dapper Denim cardstock
    • Card layer measures 4" x 5 1/4"
    • Card layer measures 2 3/8" x 3 3/4"
      • Cut using die #5*
    • Card layer (inside) measures 5/8" x 5 1/4"
  • Tranquil Tide cardstock
    • Card layer measures 2 3/8" x  3 3/4"
      • Cut using die #5
    • Scrap for 1 3/8" circle
  • Eastern Palace Specialty Designer Series Paper
    • Card layer measures 3 3/4" x 5"
    • Card layers (cut 2) measure 2" x 3 3/8"
      • Cut using die #6
    • Card layer (inside) measures 1/2" x 5 1/4"
  • Crafts by Beth CPP Sentiments
    • Click, Print and Punch
    • Click HERE for more information
  • Stitched Rectangle Framelits
  • Circle 1 3/8" and 1 1/4" punches
  • Dapper Denim ruched ribbon
  • Pearl Basic Jewels
  • Dimensionals
* Largest die is considered #1


Monday, June 20, 2016

Using Card Maps Series VI

Using Card Maps
 
What I have discovered in this series, "Using Card Maps", using coordinating pattern paper makes it so much easier.  That is why I LOVE STAMPIN' UP!
 
Stampin' Up! Products
  • Very Vanilla cardstock
    • Card base measures 4" x 5 1/2"
    • Card layer measures 1 3/4" x 4 1/4"
    • Card layer measures 2" x 3 1/2"
    • Scrap for 2 1/8" circle
  • Mint Macaron cardstock
    • Banner measures 1 3/4" x 3/4"
    • Scrap for 2 3/8" circle
      • Punch flowers from center
  • Pretty Petals Designer Series Paper
    • Card layer measures 3 3/4" x 5 1/4"
    • Card layer measures 1 1/2" x 4"
    • Card layer measures 1 3/4" x 3 1/4"
  • Tin of Cards stamp set
  • Basic Black ink
  • Circle dies (2 1/8" and 2 3/8")
  • Itty Bitty Accents punch
  • Basic Pearl Jewels
  • Dimensionals

Sunday, July 15, 2018

Using Card Maps Pretty Petals Series - I

Today I begin a new Using Card Maps Series using the Pretty Petals Designer Series Paper by Stampin' Up!.  I created this card and ten other with measurements. If you would like the measurements of the additional ten cards, the PDF file is only $5.00. This is the perfect opportunity to use the designer paper that you have. *

This tutorial is FREE with your Stampin' Up! $25 or more order using the Host Code at the top right hand corner of the blog.


Take a look at my past Using Card Maps Series by clicking HERE.


Stampin' Up! Products
  • Very Vanilla cardstock
    • Card base measures 8" x 5 1/2"
      • Scored at 4"
    • Card layer (inside) measures 3 3/4" x 5 1/4"
    • Banner measures 3 1/2" x 1/2"
  • Calypso Coral cardstock
    • Scrap for flowers (cut 2)
  • Old Olive cardstock
    • Card layer measures 3 3/4" x 5 1/4"
    • Scrap for scallop circle 3 3/4" x 3 3/4"
    • Banner measures 3 1/2" x 3/4"
    • Banner (inside) measures 3 3/8" x 3/4"
    • Scrap for sprig (cut 2)
  • Pretty Petals Designer Series Paper
    • Card layer measures 3 5/8" x 5 1/8"
    • Banner (inside) measures 3 1/4" x 1/2'
    • Scrap for circle 3 1/2" x 3 1/2"
  • You Are My Anchor stamp set
    • Paper Pumpkin - May 2018
  • Old Olive ink
  • Circle and scallop circle dies (non SU)
  • Banner Triple and Itty Bitty Accents punches
  • Sprig punch (non SU)
  • Dimensionals
  • Black jewels

* This tutorial is only available through December 31, 2018.

Wednesday, May 8, 2013

Pocket Card Tutorial

I found eyelet thank you cards a few years ago and I purchased them just for the envelopes.  I couldn't pass up 40 envelopes for $2.00, could you?  This is the card I created using the eyelet thank you cards.

From this (the printed "thank you" is hid inside the pocket).
To this


I knew my blog followers would love to make a card similar to this.  Below are the instructions for your own Pocket Card using Stampin' Up! products only....voila!

Stampin' Up! Products
  • Whisper White cardstock
    • Card base measures 8 1/2" x 5 1/2", score along 8 1/2" side at 4 1/4" and 7 1/4"
    • Pocket card layer measures 4 5/8" x 4"
  • Sahara Sand cardstock
    • Pocket card layer measure 4 3/4" x 4 1/8"
  • Real Red cardstock
    • Strip on card base measures 5 1/2" x 1/4"
    • Scraps for two flowers
  • Delicate Dots Designer Series Paper (retired)
    • Top layer on card base measures 5 1/2" x 1 1/4"
    • Bottom layer on card base measures 5 1/2" x 3"
  • Bitty Butterfly, Blossom, 1 1/4" and 1 3/8" Circle, Corner Rounder and Eyelet Border (retired) hand punches
  • Crafts by Beth CPP Sentiments*
    • Printed on Whisper White cardstock
  • Sticky Strip
  • Dimensionals
  • Basic Pearl Jewel

* Crafts by Beth's Click, Print and Punch - Please view THIS posting for updated information about Crafts By Beth CPP sentiments.

Step 1
  • Begin with a piece of cardstock measuring 8 1/2" x 5 1/2"
  • Score at 4 1/4" and 7 1/4" along the 8 1/2" side
  • Using any border punch, punch across the edge of nearest your scored 7 1/4" mark
  • Using a corner rounder punch, punch the corners as indicated in the picture below
Step 2
  • Using the corner rounder punch, punch one edge of the piece of Designer Series Paper (DSP) that measures 5 1/2" x 1 1/4"
  • Attach to card base
  • Apply Sticky Strip as indicated below

  • Remove Sticky Strip and close the card base. 
Step 3
  • Apply adhesive to the DSP that measures 5 1/4" x 3"
  • Apply adhesive to the eyelet punched flap and seal as indicated in this picture
  • Attach the 5 1/2" x 1/4" strip
Step 4
  • Use the corner rounder punch and punch out the top edge of Sahara Sand cardstock 4 3/4" x 4 1/8" piece and DSP 4 5/8" x 4" piece
  • Attach the DSP to the Sahara Sand cardstock
  • Attach embellishment using Dimensionals strategically placed to keep the flower to the outside of the card.

Sunday, December 16, 2018

Creating Cards Using Card Maps/Layouts

In the past, I have created cards using card maps/layouts by starting with the card base. I still struggled finding the perfect image to use on a specific card layout.  This time I stamped the image and then looked through my card map/layout pins on Pinterest (HERE)  and created the card from the top layer down.

Stampin' Up! Products
  • Early Espresso cardstock
    • Card base measures 8 1/2" x 5 1/2"
      • Scored at 4 1/4"
    • Scrap for circle and sentiment mats
    • Card layer (inside) measures 5/8 x 5 1/4"
  • Very Vanilla cardstock
    • Card layer measures 4" x 5 1/4"
    • Card layer measures 4" x 1 3/4"
    • Scrap for stamped image circle and sentiment
  • Moroccan Designer Series Paper
    • Card layer measures 3 7/8" x 5 1/8"
    • Card layer measures 3 7/8" 1 5/8"
    • Card layer (inside) measures 1/2" x 5 1/4"
  • Lovely as a Tree stamp set
  • Crafts by Beth CPP Sentiments
    • Click HERE for more information
  • Early Espresso ink
  • Circle punches 1 1/4" and 1 3/8"
  • Circle and stitched circle dies (non SU)
  • Alcohol marker
  • Dimensionals

Friday, June 18, 2021

Boho Indigo Ferns and Flowers - Another Fabulous Friday


My sixteen different card designs using Stampin' Up!'s Boho Indigo Medley Designer Series Paper is now available.  The tutorial is FREE when you purchase $60 worth of Stampin' Up! products using my current Hostess Code located at the top right hand side of my blog.  The tutorial is also available for purchase for $10.95. For more information and to purchase the tutorial, click HERE

Stampin' Up! Products
  • Very Vanilla cardstock
    • Card base measures 5 3/8" x 8 1/2"
      • Scored at 4 1/4"
      • Trim folded card to 5 3/8" x 4 1/16"
    • Card layer (inside) measures 5 3/8" x 4"
      • Die cut using #1
  • Misty Moonlight cardstock
    • Card layer measures 5" x 3 3/4"
      • Die cut using #2 *
  • Night of Navy cardstock
    • Card layer measures 5 3/8" x 4"
      • Die cut using #1 *
    • Card layer (inside) measures 5/8" x 4" (trimming needed)
    • Scraps for ferns  (trimming needed)
      • For added dimension, glue two layers together
  • Boho Indigo Medley Designer Series Paper
    • Card layer measures 4 5/8" x 3 1/8"
      • Die cut using #3 *
        • You can possible get to pieces of this DSP out of a 6" x 6" if you cut your layer to 4 5/8" x 3" and carefully place inside die
    • Card layer (inside) measures 1/2" x 4"  (trimming needed)
    • Embossed card layers measures 1 1/4" x 2 5/8" (cut 3)
      • Die cut using #8 * 
  • Stampin' Blends Light Daffodil Delight
  • Boho Indigo dies
  • Stitched Rectangle Framelits
  • Flower Trio punch
  • Pearl Basic Jewels
  • Dimensionals
    • Placed between Night of Navy and Misty Moonlight cardstock layers
* Dies are number with #1 being the largest


Coordinating Acetate Gift Box


This card was inspired by a similar layout by Created by Kath found on Pinterest.

Thursday, July 23, 2020

you can do this...


If you like this card, check out my Forever Greenery Series HERE

Stampin' Up! Products
  • Soft Seafoam cardstock
    • Card base measures 8 1/2" x 5 1/2"
      • Scored at 4 1/4"
      • I actually trim my folded card base to 4 1/16" x 5 7/16"
    • Card layer (sentiment) measures 4" x 1 3/4"
      • Cut using Stitched Rectangle die #2
        • Cut using stitched curved die (non SU) refer to picture below
    • Scrap for largest sprig
  • Garden Green cardstock
    • Card layer measures 4" x 5 1/4"
      • Die cut using Stitched Rectangle die #1 *
    • Card layer (inside) measures 5/8" x 5 1/4"
    • Scrap for sprig
  • Pear Pizzazz cardstock
    • Scrap for sprig
  • Whisper White cardstock
    • Card layer (inside) measures 4" x 5 1/4"
      • Die cut using Stitched Rectangle die #1
  • Forever Greenery Designer Series Paper
    • Card layer measures 3 1/2" x 4 7/8"
      • Die cut using Stitched Rectangle die #2 
    • Card layer measures 3 1/2" x 1 1/4" 
      • Die cut using Stitched Rectangle die #2
        • Die cut using stitched curved die refer to picture below
    • Card layer (inside) measures 1/2" x 5 1/4"
  • Forever Fern stamp set
    • Garden Green ink (used for all sprigs)
  • Old Olive Stampin' Blend
  • Stitched Rectangle Framelits and Forever Flourishing dies
  • Stitched curved lines (non SU)
  • Satin 1/4" ribbon
  • Pearl Basic Jewel (dyed)
  • Dimensionals
    • Under Soft Sea Foam sentiment layer
  • Mini Dimensionals
    • Under right part of Pear Pizzazz sprig
* Stitched Rectangle Framelits are numbered starting with the largest being #1.


I was inspired by this card map

Saturday, August 22, 2020

Eastern Well Wishes - Using Card Maps


If you have followed my last three blog posts HERE I provided tips and pictures of how I tackle using card maps.

Stampin' Up! Products
  • Dapper Denim cardstock
    • Card base measures 8 1/2" x 5 1/2"
      • Scored at 4 1/4"
  • Tranquil Tide cardstock
    • Card layer (inside) measures 5/8" x 5 1/4"
    • Scrap for fern/sprig and 2 5/8" x circle
  • Very Vanilla cardstock
    • Card layer measures 1 15/16" x 5 1/4"
    • Card layer measures 1 15/16" x 1 15/16"
    • Card layer measures 1 15/16" x 3 3/16"
    • Card layer (inside) measures 4" x 5 1/4"
    • Scrap for 2 3/8" circle
  • Eastern Palace Specialty Designer Series Paper
    • Card layer measures 1 13/16" x 5 1/8"
    • Card layer measures 1 13/16" x 1 13/16"
    • Card layer measures 1 13/16" x 3 1/16
    • Card layer (inside) measures 1/2" x 5 1/4"
  • Dandelion Wishes stamp set
  • Dapper Denim ink
  • Circle and Forever Flourishing dies
  • Itty Bitty Accents punch
  • Pearl Basic Jewels
  • Dimensionals


My Measure-it-Once Sample

Wednesday, August 5, 2020

Sympathy - Using Card Maps


Stampin' Up! Products
  • Old Olive cardstock
    • Card base measures 8 1/2" x 5 3/8"
      • Scored at 4 1/4"
      • I actually trim down folded card base to 4 1/16" x 5 3/8" 
    • Card layer measures 5 1/8" x 3 5/8"
      • Die cut using Stitched Rectangle Framelits #2 *
        • From center stamp and die cut leaf cluster
  • Mossy Meadow cardstock
    • Card layer measures 5 3/8" x 4 1/8"
      • Die cut using Stitched Rectangle Framelits #1 *
        • From the center die cut using square stitched die (see tip below)
  • Whisper White cardstock
    • Card layer measures 5 1/4" x 4"
      • Die cut using Stitched Rectangle Framelits #1 *
  • Garden Lane Designer Series Paper
    • Card layer measures 4 1/2" x  3 1/4"
      • Die cut using Stitched Rectangle Framelits #3 *
  • Flourishing Phrases and Forever Fern stamp sets
  • Mossy Meadow and Old Olive inks
  • Stitched Rectangle Framelits
  • Forever Flourishing dies
  • Stitched square dies (non SU)
  • Dimensionals
    • Under Old Olive layer and leaf sprig
* Dies are numbered beginning with the largest being #1

Tip
I use scrap cardstock to fill in the spaces that I die cut in the middle so the center doesn't sag.


As you can see, I changed up the layout from this card map.


Monday, August 10, 2020

Butterfly Gala Eastern Palace - Using Card Maps

If you have followed my last three blog posts HERE I provided tips and pictures of how I tackle using card maps.

Stampin' Up! Products

  • Very Vanilla cardstock
    • Card base measures 8 1/2" x 5 1/2"
      • Scored at 4 1/4"
    • Card layer (inside) measures 4' x 5 1/4"
    • Scrap for 2 1/8" circle die cut and butterflies
  • Dapper Denim cardstock
    • Card layer measures 4" x 5 1/4"
  • Tranquil Tide cardstock
    • Card layer (inside) measures 5/8" x 5 1/4"
    • Scrap for 2 3/8" circle die cut
  • Eastern Palace Specialty Designer Series Paper
    • Card layer measures 1 3/8" x 5 1/4"
    • Card layer measures 2 3/4" x 4"
    • Card layer measures 4" x 1 1/8"
    • Card layer (inside) measure 1/2" x 5 1/4"
  • Butterfly Gala stamp set
  • Memento black and Tranquil Tide inks
  • Circle dies
  • Butterfly Duet punch
  • Pearl Basic Jewels
  • Dimensionals


I use the pieces of measured scrap cardstock and lay out what I think might work.


Tuesday, January 3, 2023

Favored Flowers - FREE Designer Series Paper with $50 Stampin' Up! Purchase (ends February 28, 2023)

HAPPY NEW YEAR!


It is time for SaleABration you are going to WANT this stunning Designer Series Paper called Favored Flowers. When I first saw it, I pondered if I liked it. I didn't want to purchase any more flower stamps and coordinating dies - when it arrived - Oh My Gosh STUNNING is an understatement. 

I have made my Favored Flowers Designer Series Paper Tutorial and it features twelve thirteen fourteen FIFTEEN card designs using this paper and sentiment stamps, flowers and dies that I have accumulated in my 22 years of paper crafting. The tutorial is FREE with your $50 Stampin' Up! purchase using my current Hostess Code located at the top of my blog (web version). It will also be available for purchase $12.95. Just spend $50 using my Hostess Code and you'll receive this gorgeous Designer Series Paper* AND my tutorial for FREE!

*FREE Designer Series Paper from Stampin' Up! ends on February 28, 2023 or while supplies last.

This is one of my cards. Not only will you receive the measurements you will also receive a great tutorial on how cut each section to show off the paper. The directions and great diagram are a $3.95 value.


Sneak Peek


Card #1 - Seven Panel Show Off DSP 
Includes diagram

Card #2 - Quick and Easy Layout

Card #3 - Fun Fold Leaflet
Includes diagram

Card #4 - All Occasion - No Sentiment Needed

Card #5 - Spotlight Card
Includes diagram

Card #6 - Trio Panels
Includes diagram

Card #7 - Sympathy Card

Card #8 - Bookbinding Triangle Fancy Fun Fold
Includes diagram

Card #9 - Framing the Easy Way

Card #10 - Any Embellishment will work
(flower, butterfly, dragonfly)

Card # 11- Getting the most layers out of 4" x 12"


Card #12 - Criss Cross Pocket Card Reimagined
Includes diagram

Card #13 - Bonus Card Two Ways

Card #14 - Strip Layout

Card #15 - Diagonal Cut Sentiment Two Way
Includes template

While you are ordering, don't forget to stock up on the coordinating cardstock colors: Basic Black, Basic White, Blackberry Bliss, Calypso Coral, Evening Evergreen, Fresh Freesia, Mossy Meadow, Petal Pink and Very Vanilla. 


Tuesday, June 7, 2016

Using Card Maps Series

On June 8 I will begin a new blog series titled "Using Card Maps".  On March 21, I posted the first in a long series of creating cards using card maps.

If you are having difficulty getting inspired, look for card maps and don't be afraid to experiment.  It is only paper (GASP).  I have a Pinterest Board called Card Maps, click HERE.

This is how I begin - I have a envelope filled with blank cardstock in an array of sizes.  I used inexpensive cardstock and each piece of paper has the measurement written on them. 
 
 
I begin with a blank canvas - THE CARD BASE.  I pull out different sizes to see which fits best for the design.
 
I then begin to start layering using pieces from my envelope.


Friday, August 14, 2020

Masculine Bohemian - Using Card Maps

If you have followed my last three blog posts HERE I provided tips and pictures of how I tackle using card maps.

Stampin' Up! Products
  • Very Vanilla cardstock
    • Card base measures 4 1/4" x 11"
      • Scored at 5 1/2"
    • Card layer (inside) measures 4" x 5 1/4"
  • Blackberry Bliss cardstock
    • Card layer measures 2 7/8" x 5 1/2"
    • Card layer measures 3 1/2" x 2"
      • Punch circle inside this piece
    • Card layer (inside) measures 5/8" x 5 1/4"
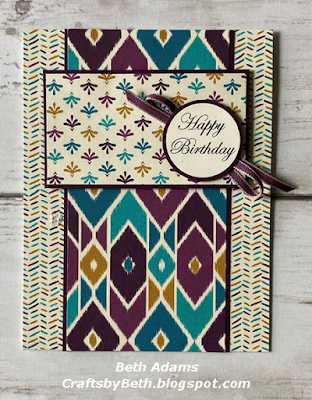
  • Bohemian Designer Series Paper
    • Card layer measures 2 3/4" x 5 1/2"
    • Card layer measures 3 3/8" x 1 7/8"
    • Card layer (inside) measures 1/2" x 5 1/4"
  • Crafts by Beth CPP Sentiments
    • Click HERE for more information
  • Circle punches 1 1/4" and 1 3/8"
  • Rich Razzleberry taffeta ribbon
  • Dimensionals
As you can see....my measurements were a little different