Showing posts with label Tutorial. Show all posts

Saturday, November 25, 2023

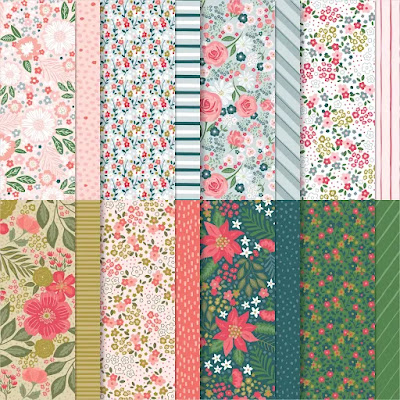
Garden Walk Designer Series Paper is Under Construction

STOP - Don't delete without scrolling down!
Check out my posts, there is more than one card design and free instructions below!

I am currently working on my new tutorial using the Garden Walk Designer Series Paper. This is retiring - grab it before it's too late.

This tutorial will be FREE if you use my current Hostess Code*.

The coordinating Stampin' Up! colors: Basic White, Calypso Coral, Garden Green, Mossy Meadow, Poppy Parade, Pretty Peacock, Very Vanilla and Wild Wheat.
But there is MORE - I have identified the following retired colors: Baja Breeze and Blushing Bride.

My current Hostess Code can be found at the top right-hand corner of my blog. Select Web Version at the bottom if you are using a smartphone or tablets.
Still can't find it? Email me HERE.
Tuesday, July 12, 2022

New Horizon Trio Layers Card


Introducing my Trio Layers Card - perfect for patterned Designer Series Paper like the New Horizon Designer Series Paper

Measurements and diagram are available. My tutorial takes the guess work out of trying to cut and stagger DSP while keeping the pattern continuity. The tutorial is available with a $25 or more Stampin' Up! product purchase using my Hostess Code. My Hostess Code can be found at the top right of blog (desktop version).  EMAIL me if you are having trouble finding my current Hostess Code. The tutorial and layout is available for purchase - $3.95

Stampin' Up! Products
  • Rich Razzleberry cardstock
  • Basic White cardstock
  • Misty Moonlight cardstock
  • New Horizon Designer Series Paper
  • Gifts of Kindness and New Horizon Designer Series Paper
  • Night of Navy ink
  • Rhinestones
  • Dimensionals

Monday, March 16, 2020

Everything is Rosy - Available for a limited time

TUTORIAL OFFER UNTIL DECEMBER 31, 2020

I will be offering ten FIFTEEN TWENTY Cards (in my tutorial) using the Everything is Rosy bundle available in the Clearance Rack at Stampin' Up! Click HERE.

I used several different items to create the TWENTY cards.  They would include Melon Mambo, Night of Navy, Pink Pirouette (any pale pink will work) and Whisper White Thick cardstocks.  I also used several different sentiments which can be easily subsituted with any sentiment stamp you may have in your stash.

I am offering an Adobe PDF file for purchase with the measurements for each card.  This file can be yours FREE with your $50 or more purchase using my Hostess Code found at the top of my blog.*


The Adobe PDF file can be purchased for $9.95 by emailing me.

* If you are viewing this on a tablet or cellphone, you may not see the Hostess Code.  Simply EMAIL me and I will give you the current code.

Thursday, January 9, 2020

Everything is Rosy Tutorial

I will be posting ten new cards using the Everything is Rosy bundle available in the Clearance Rack at Stampin' Up! Click HERE. The card photo and products used will be posted now through February 15.*


I used several different items to create the ten cards.  They would include Melon Mambo, Night of Navy, Pink Piroutte (any pale pink will work) and Whisper White Thick cardstocks.  I also used several different sentiments which can be easily subsituted with any sentiment stamp you may have in your stash.

I am offering an Adobe PDF file for purchase with the measurements for each card.  This file can be yours FREE with your $50 or more purchase using my Hostess Code found at the top of my blog.**


The Adobe PDF file can be purchased for $9.95 by emailing me

* My blog postings WILL NOT include the measurements
** If you are viewing this on a tablet or cellphone, you may not see the Hostess Code.  Simply EMAIL me and I will give you the current code.

Friday, September 9, 2016

Notecards from Scratch

Stampin' Up! has great Whisper White notecards and envelopes.  What if you want to use a colored cardstock?  It is easy to make notecards complete with homemade envelopes.  Did you know you can get three notecards from a 12" x 12" piece of cardstock.   The cards are cut at 5" x 7" and scored at 3 1/2". Careful planning and this guide will show you how.
Stampin' Up! Products
  • Crushed Curry textured cardstock
    • Card base measures 3 1/2" x 5"
    • Card layer measures 3 1/8" x 4 5/8"
  • Early Espresso cardstock
    • Card layer measures 3 1/4" x 4 3/4"
      • Cut leaf from this piece
  • Very Vanilla cardstock
    • Inside card layer measures 3 1/4" x 4 3/4"
  • Tin of Cards stamp set
  • Early Espresso ink
  • Flourish Thinlits
  • Dimensionals
  • Envelope Punch Board


Now onto the made from scratch envelope.  I purchased good quality paper from Amazon to make envelopes.  Click HERE for more information.
  1. Envelope paper measures 7 1/4" x 7 1/4"
  2. Line paper up at the 3 1/8" mark, punch and score
  3. Turn paper 90 degrees, line "Score Guide" to last scored line, punch
  4. Repeat step 3 until you have punched four times
  5. I finish the envelop flap by punching the corner using the punch board
What about the glue to seal the envelope?  No problem - I use these!  Click HERE to purchase at Amazon

Saturday, July 30, 2016

Using Card Maps Series XVII

This is a lot easier than you think!


Stampin' Up! Products
  • Peekaboo Peach cardstock
    • Card base measures 4 1/4" x 5 1/2"
  • Basic Black cardstock
    • Card layer measures 5 1/2" x 2 1/4" (prior to trimming)
  • Playful Palette Designer Series Paper
    • Card layer measures 4 1/2" x 2 1/4" (cut 2)
      • Cut layer diagonally
  • Hello Sunshine stamp set
  • Basic Black ink
  • Flower Variation
    • Emerald Envy, Peekaboo Plum and Sweet Sugarplum cardstock
    • Botanical Builder Framelits
    • Black rhinestones
  • Butterfly Variation
    • Basic Black and Emerald Envy cardstock
    • Butterfly dies (non SU)
    • Basic Pearl Jewels

Step 1:  Adhere black cardstock to card base

Step 2:  Trim off excess

Step 3:  Cut pattern paper diagonally
Step 4:  Adhere pattern paper

Step 5:  Trim off excess


Tuesday, October 2, 2012

Terrific Tuesday - Thank You Card

Welcome to Terrific Tuesday

Here is your latest installment of Terrific Tuesday - Thank You Card

Complete Stampin' Up! instructions for the card pictured here can be download and/or printed from HERE.

I hope my Terrific Tuesday Tutorials inspire you to create something from the heart.

Tuesday, March 1, 2011

New and Improved Post it Note Cover


I found some miniature pens on clearance after Christmas and I couldn't pass them up.  I wanted to incorporate the pen into my Post-it-Note Cover shown in this post and this post

I have seen videos and pictures of a similar cover, however, I wanted to incorporate the Velcro closure.  Adding a Velcro closure and a closing flap makes this perfect for carrying in the purse.  The flap and Velcro closure keep your Post-it-Notes from being mangled in the purse.

The picture tutorial with instructions and a diagram are available for the modest price of $2.79. Once your payment is processed, I will email you the three-page tutorial within twenty-four hours.